Today, I’m releasing Adaz, a project aimed at automating the provisioning of hunting-oriented Active Directory labs in Azure. This post is the making of, where we walk through how to leverage Terraform and Ansible to spin up full-blown Active Directory environments with Windows Server 2019 and Windows 10 machines.
Introduction
Meet Adaz
After a few weeks of work I’m happy to release Adaz, a project allowing to easily spin up Active Directory labs for hunting, testing threat detection methods, and more generally having fun with AD and Windows without having to deal with all the time cost that goes with it.
https://github.com/christophetd/Adaz
How simple is it, you ask?
$ terraform apply -var 'region=West US'
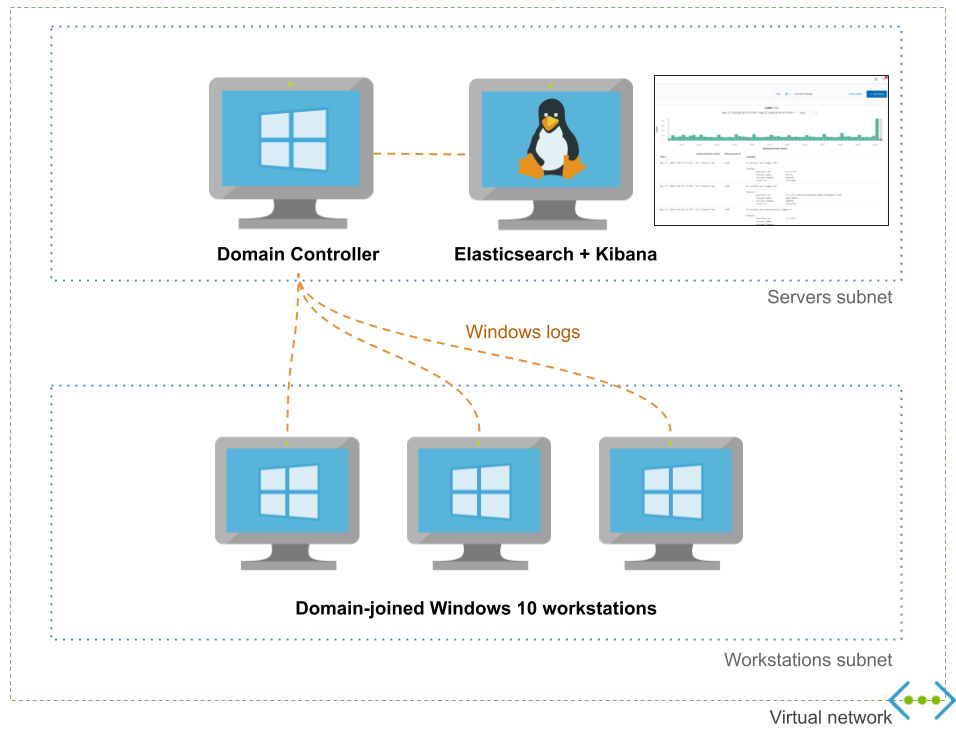
Wait 15-20 minutes for the magic to happen and that’s it! You have an Active Directory environment with:
- A Windows Server 2019 DC
- Domain-joined Windows 10 workstations
- Sysmon, Windows Event Forwarding, Audit log policies pre-configured
- A Kibana + Elasticsearch instance with your Windows logs ready to be queried
####################
###  WHAT NEXT?  ###
####################

Check out your logs in Kibana:
http://52.188.70.68:5601

RDP to your domain controller:
xfreerdp /v:52.188.70.141 /u:hunter.lab\\hunter '/p:Hunt3r123.' +clipboard /cert-ignore

RDP to a workstation:
xfreerdp /v:13.90.29.138 /u:localadmin '/p:Localadmin!' +clipboard /cert-ignore


workstations_public_ips = {
  "DANY-WKS" = "52.188.70.147"
  "XTOF-WKS" = "13.90.29.138"
}
Tooling landscape
Chris Long made an excellent job building DetectionLab, which a similar and more complete project. It supports running on AWS and on VirtualBox/VMWare workstation and can be provisioned either with Terraform and Vagrant. It’s also impossible to talk about labs without mentioning HELK made by Roberto Rodriguez.
So, you may ask, why are you rolling your own lab? Here are a few reasons:
- It’s fun, and I learned quite a lot on Azure / Terraform / Ansible / Packer in the process
- I have free credits on Azure – not on AWS
- DetectionLab uses Splunk. I wanted to use Elasticsearch for potential future integration with tools like Elastalert and Sigma rules
- DetectionLab doesn’t support having multiple Windows 10 workstations, making it harder to test things like lateral movement techniques
- The HELK architecture is quite complex
- HELK is based on Docker and hence doesn’t provide Windows 10/Windows Server VMs
- My main use-case is being able to spin up a complete AD environment with basic hunting capabilities in a short amount of time, and destroying it a few hours later
Making of
The rest of this post is the making of Adaz and shows in detail how we can leverage Terraform/Ansible to build AD labs in Azure.
What do we want?
Before we get started, let’s define what we’d like to build. Since our goal is to mimic an enterprise-like Windows environment, we want at least:
- A domain controller running Windows Server
- Domain-joined workstation(s) running Windows 10
We would also like to leverage the lab to search through the Windows event logs. In order to do that, we’ll want:
- Windows Event Forwarding, which is a built-in way to centralize logs collection
- An Elasticsearch instance to store the logs into
- Kibana, to have a nice UI to run queries
Where do we want it?
We have several choices about where to run the lab.
- Locally on our laptop, running in Virtualbox or VMWare Workstation
- On an enterprise-ready virtualization platform such as ESXi, Proxmox, or Hyper-V
- On a public cloud provider such as AWS, Azure or GCP
Although we all have different needs and use-cases, mine is to be able to spin up a lab for a few hours/days with minimal overhead and hardware, which excludes enterprise-like hypervisors. Next, I don’t want to be restricted by the RAM and especially by the disk space available on my machine, ruling out the first option.
That leaves us with the public cloud choice! How do we choose between AWS, Azure, and GCP? Easy one: AWS and GCP don’t provide the ability to run Windows 10 VMs*, so we’re left with Azure.
(* Technically, you can run Windows 10 VMs in AWS if you build your own AMI and bring your own Windows 10 license…)
You can create an Azure subscription here. Microsoft gives you $200 worth of credits for the first 30-day period. Alternatively, if your organization uses Microsoft technologies, there’s a chance they can give you a Visual Studio subscription which includes a monthly amount of Azure credits. Mine provided me with a Visual Studio Dev Essentials account which gives $50/month.
Tools and technologies
We’ll be using the following tools:
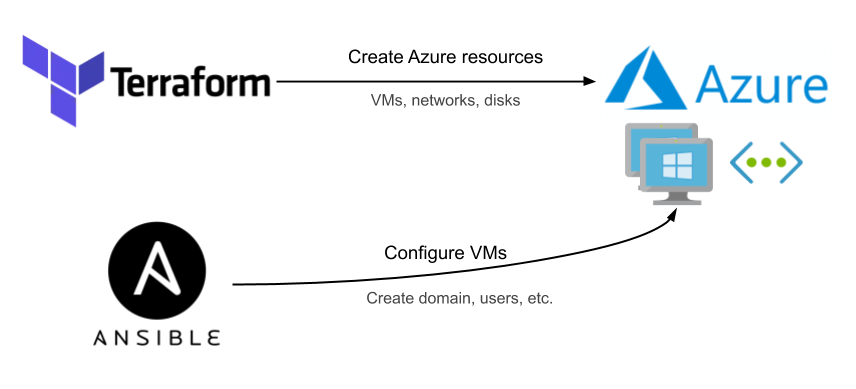
- Terraform and its Azure provider to create resources in Azure: virtual machines, networks, disks, etc. Terraform allows us to nicely define the desired state of our infrastructure “as code” using a declarative rather than an imperative style. Instead of saying “create a VM for me“, we write “make sure a VM with these specifications exists” and let Terraform do the work.
- Ansible to provision our virtual machines once they’re up and running. Ansible allows us to configure both Linux and Windows machines, using respectively SSH and WinRM to establish a remote connection. Especially, we’ll make heavy use of the Ansible modules for Windows.
Note: If you’re familiar with the DevOps tooling ecosystem, you’re probably wondering why we’re not throwing Packer in the mix. See “Why not use Packer?“
Configuring Terraform for Azure
The initial configuration is pretty straightforward:
- Download the Azure CLI and run
az login - Create a file
provider.tfwith the following code:
provider "azurerm" {
  # The version is constantly evolving, make sure to check https://github.com/terraform-providers/terraform-provider-azurerm/releases
  version = "=2.12.0"
  features {}
}
- Run
terraform init - You’re good to go!
Creating our domain controller
We’ll start with the creation of a Windows Server 2019 VM which we’ll use as a domain controller.
Prerequisite: networking
Before doing so, we need:
- A resource group to place our resources into
- A virtual network with a subnet
- A network interface to attach to our DC. We’ll assign it both a private IP in our subnet and a public IP so we can easily access it remotely
Each of these directly maps to an Azure resource. Here’s how to define this with Terraform:
# Resource group
resource "azurerm_resource_group" "resourcegroup" {
    name     = "ad-lab-resource-group"
    location = "West Europe"
}

# Virtual network 10.0.0.0/16
resource "azurerm_virtual_network" "network" {
  name                = "virtual-network"
  address_space       = ["10.0.0.0/16"]
  location            = azurerm_resource_group.resourcegroup.location
  resource_group_name = azurerm_resource_group.resourcegroup.name
}

# Subnet 10.0.0.0/24
resource "azurerm_subnet" "internal" {
  name                 = "subnet"
  resource_group_name  = azurerm_resource_group.resourcegroup.name
  virtual_network_name = azurerm_virtual_network.network.name
  address_prefixes     = ["10.0.0.0/24"]
}

# Network interface for the DC
resource "azurerm_network_interface" "dc_nic" {
  name                = "domain-controller-nic"
  location            = azurerm_resource_group.main.location
  resource_group_name = azurerm_resource_group.main.name

  ip_configuration {
    name                          = "static"
    subnet_id                     = azurerm_subnet.servers.id
    private_ip_address_allocation = "Static"
    private_ip_address = cidrhost(var.servers_subnet_cidr, 10)
    public_ip_address_id = azurerm_public_ip.main.id
  }
}
We run terraform apply and let Terraform create the resources for us.
It would be nicer if Terraform would print the public IP it assigned for our network interface, so let’s add a Terraform output:
output "domain_controller_public_ip" {
  value = azurerm_public_ip.domain_controller.ip_address
}
When we terraform apply, we can now see the public IP in the console output.
Outputs:

domain_controller_public_ip = 13.94.215.14
If you’re thinking right now: “Is this guy really exposing a domain controller to the Internet? and he pretends to work in security?!” – you’re totally right. Since this is a lab environment with (hopefully) no sensitive data in it, let’s consider that whitelisting our outgoing public IP is “good enough”.
In order to do this, we will create a Network Security Group and attach it to the network interface of our domain controller. We’ll allow RDP and WinRM traffic. Note that we could also attach the NSG directly to the subnet, and it would apply to any machine in that subnet.
# Note: you'll need to run 'terraform init' before terraform apply-ing this, because 'http' is a new provider

# Dynamically retrieve our public outgoing IP
data "http" "outgoing_ip" {
  url = "http://ipv4.icanhazip.com"
}
locals {
  outgoing_ip = chomp(data.http.outgoing_ip.body)
}

# Network security group
resource "azurerm_network_security_group" "domain_controller" {
  name                = "domain-controller-nsg"
  location            = azurerm_resource_group.resourcegroup.location
  resource_group_name = azurerm_resource_group.resourcegroup.name

  # RDP
  security_rule {
    name                       = "Allow-RDP"
    priority                   = 100
    direction                  = "Inbound"
    access                     = "Allow"
    protocol                   = "Tcp"
    source_port_range          = "*"
    destination_port_range     = "3389"
    source_address_prefix      = "${local.outgoing_ip}/32"
    destination_address_prefix = "*"
  }

  # WinRM
  security_rule {
    name                       = "Allow-WinRM"
    priority                   = 101
    direction                  = "Inbound"
    access                     = "Allow"
    protocol                   = "Tcp"
    source_port_range          = "*"
    destination_port_range     = "5985"
    source_address_prefix      = "${local.outgoing_ip}/32"
    destination_address_prefix = "*"
  }
}

# Associate our network security group with the NIC of our domain controller
resource "azurerm_network_interface_security_group_association" "domain_controller" {
  network_interface_id      = azurerm_network_interface.dc_nic.id
  network_security_group_id = azurerm_network_security_group.domain_controller.id
}
We’re good to go!
Creating a Windows Server 2019 VM
This page lists some commonly used Windows Server base images. We’ll use MicrosoftWindowsServer:2019-Datacenter:latest. In addition, we set a randomly-generated initial administrator password and enable WinRM.
# Note: you'll need to run 'terraform init' before terraform apply-ing this, because 'random_password' is a new provider
# Generate a Random password for our domain controller
resource "random_password" "domain_controller_password" {
  length = 16
}
# ... and make sure it's shown to us in the console output of 'terraform apply'
output "domain_controller_password" {
  value = random_password.domain_controller_password.result
}

# VM for our domain controller
resource "azurerm_virtual_machine" "domain_controller" {
  name                  = "domain-controller"
  location              = azurerm_resource_group.resourcegroup.location
  resource_group_name   = azurerm_resource_group.resourcegroup.name
  network_interface_ids = [azurerm_network_interface.dc_nic.id]
  # List of available sizes: https://docs.microsoft.com/en-us/azure/cloud-services/cloud-services-sizes-specs
  vm_size               = "Standard_D1_v2"

  # Base image
  storage_image_reference {
    publisher = "MicrosoftWindowsServer"
    offer     = "WindowsServer"
    sku       = "2019-Datacenter"
    version   = "latest"
  }

  # Disk
  delete_os_disk_on_termination = true
  storage_os_disk {
    name              = "domain-controller-os-disk"
    create_option     = "FromImage"
  }

  os_profile {
    computer_name  = "DC-1"
    # Note: you can't use admin or Administrator in here, Azure won't allow you to do so :-)
    admin_username = "christophe"
    admin_password = random_password.domain_controller_password.result
  }
  os_profile_windows_config {
    # Enable WinRM - we'll need to later
    winrm {
      protocol = "HTTP"
    }
  }

  tags = {
    kind = "domain_controller"
  }
}
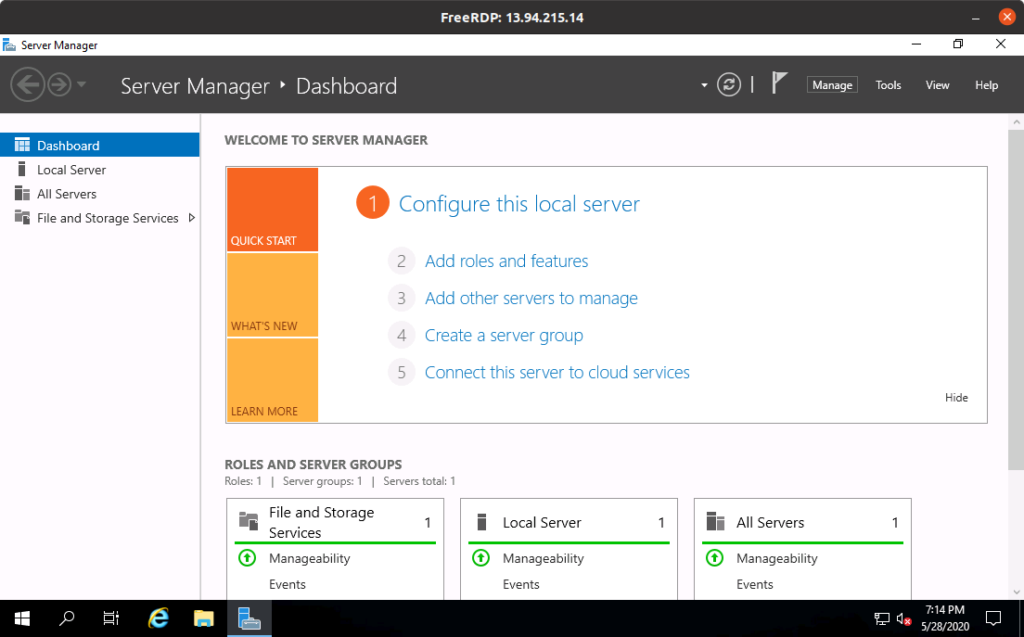
Now sit back and relax. The creation of a Windows virtual machine is quite slow and should take between 2 and 5 minutes. Once it’s done, we can RDP to the machine using its public IP and the randomly generated administrator password.
Apply complete! Resources: 2 added, 0 changed, 0 destroyed.

Outputs:

domain_controller_password = ALj}%ocW&y?uTWZG
domain_controller_public_ip = 13.94.215.14
Using xfreerdp, for instance:
xfreerdp /v:13.94.215.14 /u:christophe '/p:ALj}%ocW&y?uTWZG' /w:1700 /h:1000 +clipboard
Setting up Ansible to configure the domain controller
Now that we have a domain controller up and running, we’d like to configure it. Ansible can provision Windows machines using WinRM, and we’ll use the Azure dynamic inventory plugin, which will allow us to automatically target our virtual machines without hardcoding any IP address in the Ansible configuration.
# group_vars/domain_controllers
ansible_connection: winrm
ansible_winrm_transport: ntlm
ansible_winrm_scheme: http
ansible_winrm_port: 5985
# inventory_azure_rm.yml
plugin: azure_rm
auth_source: cli
include_vm_resource_groups:
- ad-lab-resource-group
conditional_groups:
  # Place every VM with the tag "kind" == "domain_controller" in the "domain_controllers" Ansible host group
  domain_controllers: "tags.kind == 'domain_controller'"
# ansible.cfg
[defaults]
inventory=./inventory_azure_rm.yml
nocows=1
Let’s create a very basic playbook creating a file C:\hello.txt to confirm Ansible is able to connect to our machine and run it.
---
- name: Configure domain controllers
  hosts: domain_controllers
  gather_facts: no
  tasks:
  - name: Create test file
    win_file:
      path: C:\hello.txt
      state: touch
$ ansible-playbook dc.yml --inventory inventory_azure_rm.yml \
  -e AZURE_RESOURCE_GROUPS=ad-lab-resource-group \
  --user christophe --ask-pass

PLAY [Configure domain controllers]

TASK [Create test file]
changed: [domain-controller_7e4d]

PLAY RECAP
domain-controller_7e4d     : ok=1    changed=1    unreachable=0    failed=0    skipped=0    rescued=0    ignored=0
Provisioning a Windows domain with Ansible
Now that we have our domain controller up and running, the next step is to create a Windows domain. Ansible offers modules precisely for this purpose:
- win_domain: Ensures the existence of a Windows domain
- win_domain_controller: Manage domain controller/member server state for a Windows host
---
- name: Configure domain controllers
  hosts: domain_controllers
  gather_facts: no
  vars:
    domain_name: christophe.lab
    domain_admin: christophe
    domain_admin_password: "{{ ansible_password }}"
    safe_mode_password: "This_should_have_been_a_randomly_generated_password:("

  tasks:
  - name: Ensure domain is created
    win_domain:
      dns_domain_name: "{{ domain_name }}"
      safe_mode_password: "{{ safe_mode_password }}"
    register: domain_creation

  - name: Reboot if domain was just created
    win_reboot: {}
    when: domain_creation.reboot_required

  - name: Ensure domain controllers are promoted
    win_domain_controller:
      dns_domain_name: "{{ domain_name }}"
      domain_admin_user: "{{ domain_admin }}@{{ domain_name }}"
      domain_admin_password: "{{ domain_admin_password }}"
      safe_mode_password: "{{ safe_mode_password }}"
      state: domain_controller
      log_path: C:\Windows\Temp\promotion.txt
    register: dc_promotion

  - name: Reboot if server was just promoted to a domain controller
    win_reboot: {}
    when: dc_promotion.reboot_required
This isn’t fast because creating a domain and promoting a server to a domain controller are non-trivial operations and both require a full reboot. Expect that it will take around 10 minutes.
Once this playbook has been run, note that you’ll need to specify the name of the domain (here, christophe.lab) when connecting via RDP, e.g.
xfreerdp /v:13.81.2.38 /u:christophe.lab\\christophe /p:LbeR5EHKJxXzAqaJ /cert-ignore
Now that we have a proper Windows domain and a domain controller, let’s add some domain-joined workstations!
Adding Windows 10 workstations
The creation of the Windows 10 VM and NIC is very similar so we won’t go into too much detail. The most challenging part for me was to find the right reference for the image base, the solution being to use az vm image list -f "Windows-10" --all to find the right image for Windows 10 Pro 1909 N.
Another interesting capability of Terraform that we can leverage is its ability to create multiple instances of a resource. This is useful for workstations because we’ll typically want several of them. Let’s store this information in a Terraform variable.
variable "num_workstations" {
  description = "Number of workstations to create"
  type = number
  default = 2
}
Let’s now create a network security group for our workstations, and a network interface with a public IP for each one of them.
# Network security group
resource "azurerm_network_security_group" "workstations" {
  name                = "workstations-nsg"
  # Rest is the same as for the domain controller NSG!
}

# Create 1 public IP per workstation
resource "azurerm_public_ip" "workstation" {
  count = var.num_workstations

  name                    = "workstation-${count.index + 1}-public-ip"
  location                = azurerm_resource_group.resourcegroup.location
  resource_group_name     = azurerm_resource_group.resourcegroup.name
  allocation_method       = "Static"
}

# Create 1 NIC per workstation
resource "azurerm_network_interface" "workstations_nic" {
  count = var.num_workstations

  name                = "workstation-${count.index + 1}-nic"
  location            = azurerm_resource_group.resourcegroup.location
  resource_group_name = azurerm_resource_group.resourcegroup.name

  ip_configuration {
    name                          = "static"
    subnet_id                     = azurerm_subnet.internal.id
    private_ip_address_allocation = "Static"
    private_ip_address            = cidrhost("10.0.0.128/25", 100 + count.index)
    public_ip_address_id          = azurerm_public_ip.workstation[count.index].id
  }
}

# Associate our network security group with the NIC of our workstations
resource "azurerm_network_interface_security_group_association" "workstations" {
  count = var.num_workstations

  network_interface_id      = azurerm_network_interface.workstations_nic[count.index].id
  network_security_group_id = azurerm_network_security_group.workstations.id
}
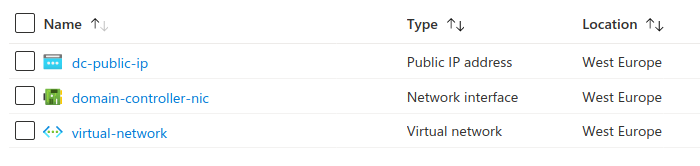
This will create the following resources in Azure:
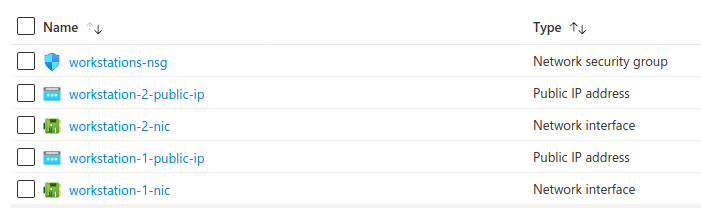
The interesting bits are:
count = var.num_workstations: repeat the current resource var.num_workstations timesprivate_ip_address = cidrhost("10.0.0.128/25", 100 + count.index): using the cidrhost function, we assign IP addresses 10.0.0.128, 10.0.0.129, 10.0.0.130… to each workstation
Let’s now create our actual Windows 10 workstation VMs!
# Generate a random password and reuse it for each local admin account on workstations
resource "random_password" "workstations_local_admin_password" {
  length  = 16
  special = false
}

# Window 10 workstations
resource "azurerm_virtual_machine" "workstation" {
  count = var.num_workstations

  name                  = "workstation-${count.index + 1}"
  location              = azurerm_resource_group.resourcegroup.location
  resource_group_name   = azurerm_resource_group.resourcegroup.name
  network_interface_ids = [azurerm_network_interface.workstations_nic[count.index].id]
  # List of available sizes: https://docs.microsoft.com/en-us/azure/cloud-services/cloud-services-sizes-specs
  vm_size               = "Standard_D1_v2"


  storage_image_reference {
    # az vm image list -f "Windows-10" --all
    publisher = "MicrosoftWindowsDesktop"
    offer     = "Windows-10"
    sku       = "19h1-pron"
    version   = "latest"
  }

  delete_os_disk_on_termination = true
  storage_os_disk {
    name              = "workstation-${count.index + 1}-os-disk"
    create_option     = "FromImage"
  }

  os_profile {
    computer_name  = "WORKSTATION-${count.index + 1}"
    admin_username = "localadmin"
    admin_password = random_password.workstations_local_admin_password.result
  }
  os_profile_windows_config {
      winrm {
        protocol = "HTTP"
      }
  }

  tags = {
    kind = "workstation"
  }
}
Just like before, we’d like to have some visibility on the public IPs and the local administrator password generated for us, so let’s create an output for these:
output "workstations_public_ips" {
  value = azurerm_public_ip.workstation.*.ip_address
}

output "workstations_local_admin_password" {
  value = random_password.workstations_local_admin_password.result
}
Outputs:

[...]
workstations_local_admin_password = "Uxae3qltIGyxg6WA"

workstations_public_ips = [
  "13.80.143.17",
  "52.166.236.117",
]
With a little extra effort, we can even output a ready-to-use command line to RDP in the workstations:
output "workstations_rdp_commandline" {
  value = {
    for i in range(var.num_workstations):
    "workstation-${i + 1}" => "xfreerdp /v:${azurerm_public_ip.workstation[i].ip_address} /u:localadmin /p:${random_password.workstations_local_admin_password.result}  /w:1100 /h:650 +clipboard /cert-ignore"
  }
}
Outputs:

[...]
workstations_rdp_commandline = {
  "workstation-1" = "xfreerdp /v:13.80.143.17 /u:localadmin /p:Uxae3qltIGyxg6WA  /w:1100 /h:650 +clipboard /cert-ignore"
  "workstation-2" = "xfreerdp /v:52.166.236.117 /u:localadmin /p:Uxae3qltIGyxg6WA  /w:1100 /h:650 +clipboard /cert-ignore"
}
Et voilà, after waiting for a few minutes we have our workstations! In my experiments, spinning up the workstations consistently takes around 5 minutes. That said since the creation of the VMs is parallelized by Terraform, it should take the same amount of time whether we provision 1 or 10 workstations. We can also easily scale up or scale down our lab by changing the num_workstations variable:
$ terraform apply -var 'num_workstations=1'
# Scale up!
$ terraform apply -var 'num_workstations=5'
# Scale down and remove 2 workstations
$ terraform apply -var 'num_workstations=3'
Joining workstations to the domain with Ansible
Ansible has a handy module, win_domain_membership, allowing to manage the domain membership status of a machine. All we need to do is therefore to map our kind: workstations tag in the dynamic Ansible inventory and write the appropriate playbook to ensure workstations are domain-joined.
# inventory_azure_rm.yml
plugin: azure_rm
auth_source: cli
include_vm_resource_groups:
- ad-lab-resource-group
conditional_groups:
  # Place every VM with the tag "kind" == "domain_controller" in the "domain_controllers" Ansible host group
  domain_controllers: "tags.kind == 'domain_controller'"

  # Same for workstations
  workstations: "tags.kind == 'workstation'"
# group_vars/workstations
ansible_connection: winrm
ansible_winrm_transport: ntlm
ansible_winrm_scheme: http
ansible_winrm_port: 5985
# workstations.yml
---
- name: Configure workstations
  hosts: workstations
  vars:
    # Note: these should ideally placed into a shared variable file (such as group_vars/all)
    # to avoid duplication with the DC playbook
    domain_name: christophe.lab
    domain_admin: christophe
  vars_prompt:
  - name: domain_admin_password
    prompt: "Domain admin password"
  tasks:
  - name: Set DC as DNS server
    win_dns_client:
      adapter_names: '*'
      ipv4_addresses: "{{ hostvars[groups['domain_controllers'][0]].private_ipv4_addresses }}"

  - name: Ensure workstation is domain-joined
    win_domain_membership:
      dns_domain_name: "{{ domain_name }}"
      hostname: "{{ ansible_env.COMPUTERNAME }}"
      domain_admin_user: "{{ domain_admin }}@{{ domain_name }}"
      domain_admin_password: "{{ domain_admin_password }}"
      state: domain
    register: domain_state

  - name: Reboot machine if it has just joined the domain
    win_reboot: {}
    when: domain_state.reboot_required
Result:
$ ansible-playbook workstations.yml --inventory inventory_azure_rm.yml \
    -e AZURE_RESOURCE_GROUPS=ad-lab-resource-group \
    --user localadmin --ask-pass

SSH password:
Domain admin password:

PLAY [Configure workstations]

TASK [Gathering Facts]

ok: [workstation-2_2760]
ok: [workstation-1_3271]

TASK [Set DC as DNS server]
ok: [workstation-1_3271]
ok: [workstation-2_2760]

TASK [Ensure workstation is domain-joined]
changed: [workstation-1_3271]
changed: [workstation-2_2760]

TASK [Reboot machine if it has just joined the domain]
changed: [workstation-1_3271]
changed: [workstation-2_2760]

PLAY RECAP
workstation-1_3271         : ok=4    changed=2    ...
workstation-2_2760         : ok=4    changed=2    ...
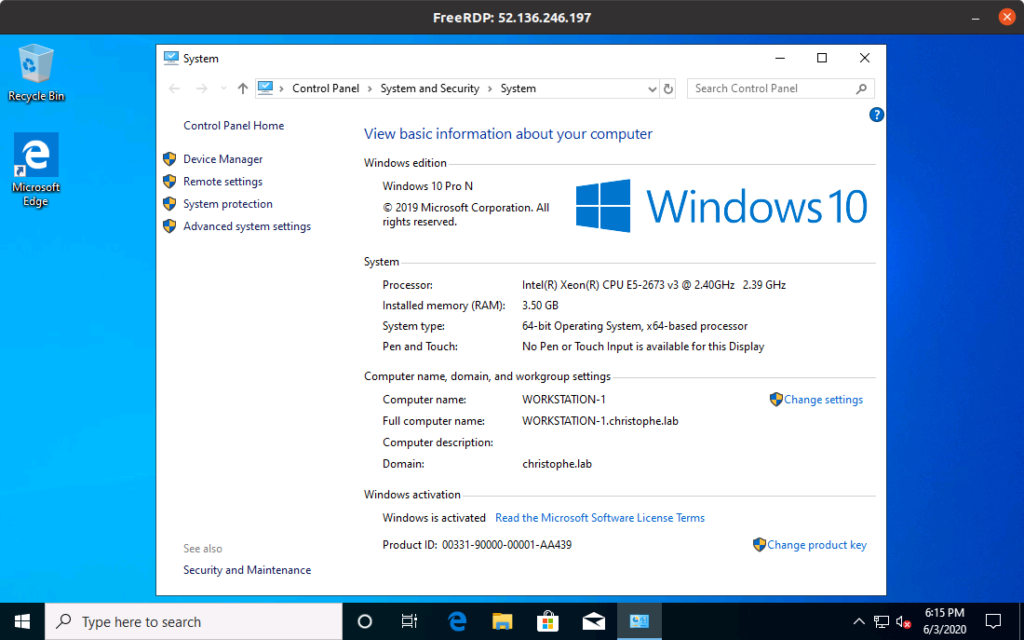
Our workstations are now domain-joined:
Automating the provisioning of virtual machines after creation
The process is still a bit cumbersome because to provision our lab we need to run terraform apply, and then run both Ansible playbooks manually. We can make things smoother by using the local-exec Terraform provisioner allowing us to run a local command when a resource is created. In our case, we’ll leverage it to automatically run Ansible against our domain controller upon creation:
resource "azurerm_virtual_machine" "domain_controller" {
  name = "domain-controller"

  # ...

  provisioner "local-exec" {
    command = "ansible-playbook dc.yml --user christophe -e ansible_password=${random_password.domain_controller_password.result} -e AZURE_RESOURCE_GROUPS=${azurerm_resource_group.resourcegroup.name} -v"
  }
}
Note that the playbook will only be run when the resource (here, the domain controller VM) is created. You’ll still need to run it manually every time you update it.
For workstations, we need to be a bit smarter. If we run their Ansible playbook before the domain is properly created by the domain controller playbook, they will obviously fail to join it. We want the following sequence:
- Create domain controller
- Create workstations
- Provision domain controller (including domain creation)
- Provision workstations
We can use the Terraform null_resource to introduce a “fake resource” with an explicit dependency on the domain controller, and use the local-exec provisioner to run the workstations Ansible playbook only once the domain controller has been provisioned and the domain is ready:
resource "null_resource" "provision_workstations_once_dc_has_been_created" {
  # Note: the dependency on 'azurerm_virtual_machine.workstation' applies to *all* resources created from this block
  # The provisioner will only be run once all workstations have been created (not once per workstation)
  # c.f. https://github.com/hashicorp/terraform/issues/15285
  depends_on = [
    azurerm_virtual_machine.domain_controller,
    azurerm_virtual_machine.workstation
  ]

  provisioner "local-exec" {
    command = "ansible-playbook workstations.yml --user localadmin -e domain_admin_password=${random_password.domain_controller_password.result} -e ansible_password=${random_password.workstations_local_admin_password.result} -e AZURE_RESOURCE_GROUPS=${azurerm_resource_group.resourcegroup.name} -v"
  }
}
Once the DC has been created and provisioned and the workstations VMs have been created as well, this null resource will be “created” and its local-exec block will allow us to provision the workstations with our Ansible playbook.
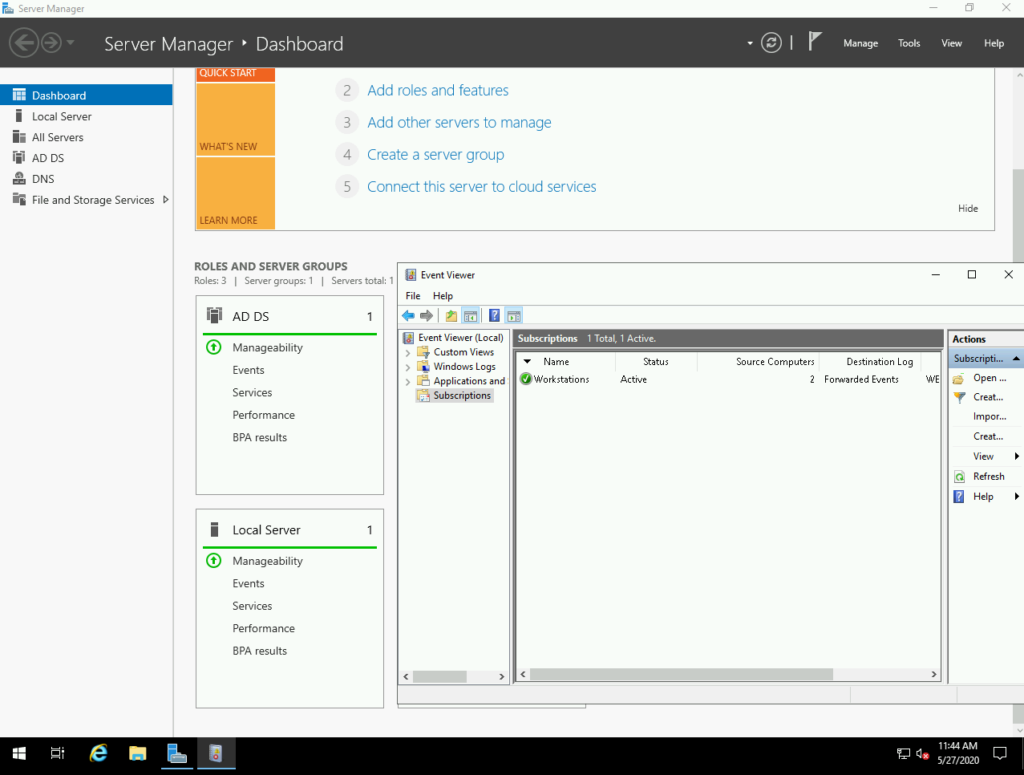
Bringing Windows Event Forwarding into play
Windows Event Forwarding is a built-in mechanism allowing to centralize Windows logs on a single machine often called the “WEC” (Windows Event Collector), “WEF collector”, or “WEF” (incorrectly).
There are multiple ways to configure it, but it’s most often configured as follows:
- On the WEC:
- Enable the Windows Event Collector service (wecsvc)
- Enable the ForwardedEvents event log
- Create a subscription, essentially saying “I’m allowing machines X to send me their event logs Y and Z“
- On WEF clients (e.g. workstations):
- Enable WinRM
- Instruct the machine to send its logs to the WEC
WEF clients are often configured via GPO, but it’s actually entirely possible (and more automation-friendly) to configure them via the registry. For the sake of conciseness (which is probably already ruined given the length of this blog post!), I won’t include the Ansible code here and will instead let you take a look at the following roles:
In our case, to avoid creating too many unnecessary VMs, our domain controller will act as a WEF collector.
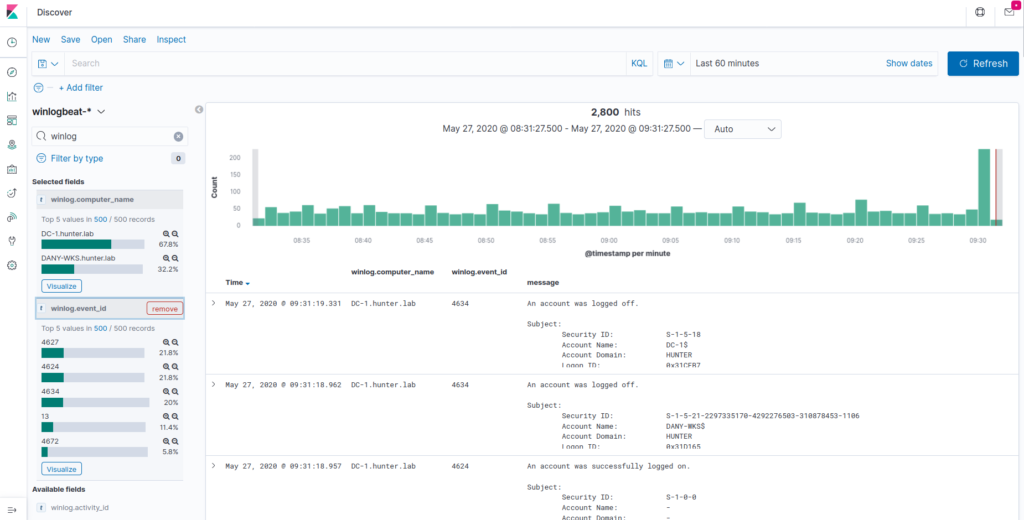
Shipping logs to Elasticsearch with Winlogbeat
Once our Windows logs are on the WEC, we need to ship them somewhere. We’ll use Elasticsearch and Kibana since they’re free and easy to install. We’ll also install Elasticsearch and Kibana on the same Ubuntu VM to simply things., and use Winlogbeat to send logs from the domain controller (acting as a WEF collector) to Elasticsearch.
The configuration is pretty straightforward:
winlogbeat.event_logs:
# Collected logs
- name: ForwardedEvents
  forwarded: true

# Logs of the domain controller itself
- name: Security
- name: Microsoft-Windows-Sysmon/Operational

output.elasticsearch:
  hosts:
  - {{ elasticsearch_ip }}:9200
  index: "winlogbeat-%{[agent.version]}-%{+yyyy.MM.dd}"

setup.template.name: "winlogbeat"
setup.template.pattern: "winlogbeat-*"
If you’re interested to see more detail on how to install and configure Winlogbeat with Ansible, take a look at the winlogbeat role!
Query me maybe: Kibana + Elasticsearch
InstallingElasticsearch with Ansible doesn’t pose any specific challenge, so we’ll directly skip through it – see elasticsearch.yml.
We need to be a little smarter for Kibana – when you set it up initially, it’s not readily configured and you need to set up your index patterns through the UI. This is what allows Kibana to know your Windows logs are sitting in Elasticsearch indexes of the form winlogbeat-*. Although Kibana doesn’t offer an option to configure this from its configuration file, we can do it using the API!
- name: List Kibana index templates
  uri:
    url: http://127.0.0.1:5601/api/saved_objects/_find?fields=title&per_page=100&type=index-pattern
    return_content: yes
  register: index_patterns
  # Initially, need to wait a bit until the server is ready
  until: index_patterns.content != "Kibana server is not ready yet" and index_patterns.status == 200
  retries: 100
  delay: 5

- name: Create Kibana index template for winlogbeat
  uri:
    url: http://127.0.0.1:5601/api/saved_objects/index-pattern
    method: POST
    body: '{"attributes":{"title":"winlogbeat-*","timeFieldName":"@timestamp","fields":"[]" }}'
    body_format: json
    headers: {'kbn-xsrf': 'kibana'}
  when: index_patterns.json.saved_objects|length == 0
Adaz: Wrapping up
I put together Adaz based on all the elements discussing in this post. It’s a bit better packaged and can be configured via a high-level YAML file so you can easily customize the users, groups, workstations, and OUs of your lab:
dns_name: hunter.lab
dc_name: DC-1

initial_domain_admin:
 username: hunter
 password: MyAdDomain!

organizational_units: {}

users:
- username: christophe
- username: dany

groups:
- dn: CN=Hunters,CN=Users
 members: [christophe]

default_local_admin:
 username: localadmin
 password: Localadmin!

workstations:
- name: XTOF-WKS
 local_admins: [christophe]
- name: DANY-WKS
 local_admins: [dany]

enable_windows_firewall: yes
There is also plenty of documentation available including a FAQ! For any suggestion or comment, feel free to open an issue or to reach out on Twitter. 🙂
Bonus
Help! terraform destroy is not working
When destroying the lab, I’ve run into issues where terraform destroy would fail with a message similar to:
Error: Error waiting for update of Network Interface "workstation-2-nic" (Resource Group "ad-lab-resource-group"): Code="OperationNotAllowed" Message="Operation 'startTenantUpdate' is not allowed on VM 'workstation-2' since the VM is marked for deletion. You can only retry the Delete operation (or wait for an ongoing one to complete)." Details=[]
This seems to be a (somewhat) known issue, and while it’s apparently possible to fix it by specifying explicit dependencies between Terraform resources, I ended up finding it easier to simply remove the Azure resource group and remove the Terraform state file:
$ az group delete --yes -g ad-lab-resource-group
$ rm terraform.tfstate
Don’t expect it to be fast, though.
Keeping admin passwords out of the command line
With the approach we took to automatically provision new resources created by Terraform with Ansible, we are passing passwords on the command line:
provisioner "local-exec" {
  command = "ansible-playbook workstations.yml --user localadmin -e domain_admin_password=${random_password.domain_controller_password.result} -e ansible_password=${random_password.workstations_local_admin_password.result} -e AZURE_RESOURCE_GROUPS=${azurerm_resource_group.resourcegroup.name} -v"
}
One of the downsides is that this exposes the password on the machine running Terraform/Ansible:
$ ps aux | grep ansible-playbook
[...] ansible-playbook workstations.yml --user localadmin -e domain_admin_password=Y4Eeo1kTb8
F0OcNI -e ansible_password=uMZjoxm6bqR56AjB -e AZURE_RESOURCE_GROUPS=ad-lab-resource-group -v
While we don’t really care for a lab environment like ours, it’s interesting to think about how we could improve this.
It boils down to the following question: how can Terraform and Ansible “communicate” together in a way that doesn’t expose passwords? Hashicorp Vault would be one way. Assuming we have a Vault instance readily available against which we’re already authenticated, we could use the Terraform Vault provider and its vault_generic_secret resource to store the randomly generated password. Once Ansible kicks in, it could then use the hashi_vault lookup plugin to pull this secret securely.
Why not use Packer?
If you’re into the DevOps ecosystem, you might have noticed that the way we’ve been provisioning our Windows machines all along is kind of an anti-pattern and doesn’t follow the immutable infrastructure principle. The complexity of our post-resource creation provisioning is high, meaning that there is a non-negligible risk something will go wrong.
The “right” way to build our lab should in theory look something like:
- Use Packer to generate an Azure base image of our DC and workstations, already provisioned by Ansible
- When we want to spin up the lab, use Terraform to instantiate it based on the base images
Packer is an awesome tool and its Azure Resource Manager builder works (out of the box) as follows:
- Create a temporary resource group
- Spin up a temporary VM
- Run our provisioning steps against it (e.g. Ansible)
- Shut down the VM
- Convert the VM disk into a disk image
- Remove all resources in the resource group
The major downside of this approach is that it is slow. First, Azure is slow. Second, since we’re building a base image, it needs to be generalized using Sysprep which is quite slow as well. From my tests, the process takes between 20 and 35 miprnutes to fully complete… while provisioning the full lab from scratch takes between 15 and 20. Admittedly, starting from a base image does make instantiation faster later on, but it also raises the question of what should be included in the base image (much harder to change) and what should be configured once resources have been instantiated in Azure.
In the context of a lab, it’s also arguable whether it makes sense to have to re-build our base image every time we want to perform a non-trivial change in our infrastructure or domain configuration.
This is the rationale why the project doesn’t include Packer resources for now, but please go vote on this issue with a thumbs up if you believe they would be valuable to have!
Pingback: Automating the provisioning of Active Directory labs in Azure | OSINT
So close to being perfect! A few comments:
1. You can’t (or rather I can’t) seem to specify a gen2 VM in Terraform. That’s a large security flaw.
2. PoSH DSC would have been a much nicer VM config tool
3. Azure best practice is to assign the NSG to the workload subnet, not the machine directly
4. No Azure Firewall (much better than NSG)
5. I know you said about RDP Security but Bastion would have made readers feel a lot more comfortable with this connectivity approach, lab or not.
Hi Mark,
Thanks for the feedback!
1) Point taken, I’ll open an issue. It definitely makes sense to extract the VM size in a Terraform variable
2) Not convinced about that, I’ve had some feedback tha PoSH DSC was a bit flaky. To be honest, the main reason why I used Ansible and not DSC is that I’m much more familiar with Ansible
3) Indeed, but for now I wanted the flexibility to specify different FW rules for every machine. I’ll probably use a subnet-wide NSG in the future though
4) It’s also much more expensive… A $1.25/hour on a <$0.5/hour lab seems hard to justify 5) True, but it also restricts you to using RDP or SSH only - here, I'm hoping to work on some integration with Sigma/Elastalert and I'm also exposing Kibana, so I'm not sure it would make sense to put everything behind an Azure Bastion. Another idea would be to put everything behind a generic Linux box and access the lab through a SSH tunnel, that's entirely possible but I fear it would unnecessarily increase complexity
The design choices as expressed in this comment make sense. The Linux box for SSH tunnel would be a nice to have, a bash or python glueware script could help the inexperienced users configure the tunnel.
When creating the association between NSG and Domain controller NIC, please correct the resource name.
===================
resource “azurerm_network_interface_security_group_association” “domain_controller” {
network_interface_id = azurerm_network_interface.domain_controller_nic.id
network_security_group_id = azurerm_network_security_group.domain_controller.id
}
===========
Here it should be azurerm_network_interface.dc_nic.id
Thanks
Corrected, thanks!
wow, your blog is amazing….
keep it up.
if you can, please do more CTF write-ups.