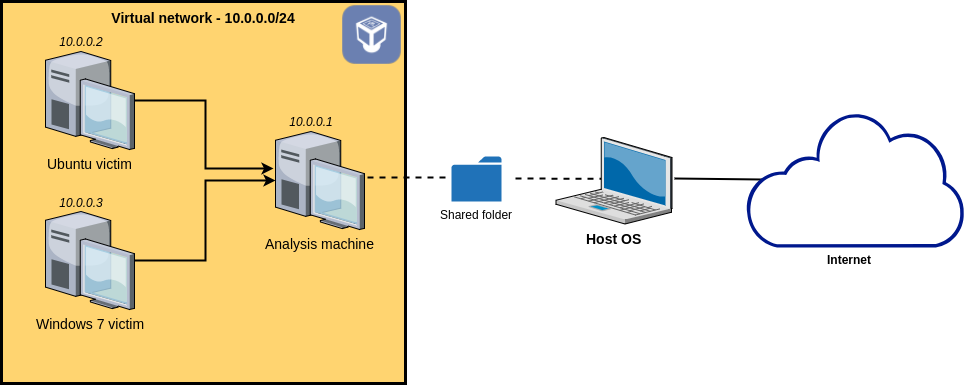
1. Creating the virtual machines
Here are two links you can use to download Ubuntu and Windows 7 virtual machine images.
- Ubuntu (victim machine 1 and analysis machine): download Ubuntu 16.10 64 bits from OsBoxes (direct link)
- Windows 7 (victim machine 2): download from the Microsoft Developer Website (select IE 11 on Win 7 (x86) and VirtualBox)
Tip: if you already have an Ubuntu virtual machine you’re not using, you can simply clone it and reuse it in the next steps (right click > Clone).
Before starting, make sure you have enough disk space available (I’d recommend at least 10-20 GB).
Base Ubuntu machine
OsBoxes provides us with a ready-to-go virtual disk that we can simply plug on a VM and start using right away. Start by extracting the archive you just downloaded.
$ 7za e Ubuntu_16.10_Yakkety-VB-64bit.7z
You’ll be provided with a VDI file representing the virtual disk of the machine. We’ll start by setting up the base Ubuntu image, which we will then clone to have our two Ubuntu VMs.
In VirtualBox, create a new machine (New button), and call it Ubuntu analysis. Then, select how much RAM you want to give it. At this point, VirtualBox will ask you if you wish to create a new virtual hard disk or use an already exiting one. Select Use an existing virtual hard disk file, click on the directory icon at the right of the dropdown list, and select the VDI file.
You can then power up the machine. The default password is osboxes.org.
Basic setup
The default keyboard uses the QWERTY layout. If like me you’re not familiar with it, start by changing it (Settings > Text Entry).
Optionally, you can also change the default password using:
$ passwd osboxes
It can also be a good idea to update your packages.
$ sudo apt-get update
$ sudo apt-get upgrade
Install the guest additions
Select Devices > Insert guest additions CD image in the menu of the window in which the VM runs. You will then be asked if you want to run the installer; answer yes, and enter the default password (by default osboxes.org). Once the installation is complete, power off the VM.
Cloning
Now that you have a basic Ubuntu VM ready to go, clone it (right click on it in the main VirtualBox interface > Clone). Name the clone Ubuntu victim, and check the checkbox to reinitialize its MAC address. Select Full clone for the type of clone.
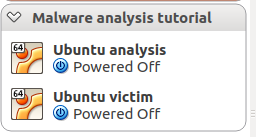
Windows 7 machine
The download link I provided earlier points to a ZIP archive containing a OVA file. Unlike a VDI file it’s not only a virtual disk, but a full description of the virtual machine (including its virtual disk), so the only thing you need to do to create a virtual machine from it is to select File > Import Appliance in the main window of VirtualBox. If you can afford it, it’s probably better to give it at least 1024 MB of RAM.
Once the import process is complete (it can take a few minutes), rename the VM Windows 7 victim and power it on.
Install the guest additions
Select Devices > Insert guest additions CD image in the menu of the window in which the VM runs, and run the installer from the virtual CD which has been inserted. When you’re done, power off the machine.
2. Setup of the analysis machine: INetSim, Burp
INetSim
INetSim is a very handy and powerful utility that allows to simulate a bunch of standard Internet services on a machine. By default, it will among others emulate a DNS, HTTP and SMTP that you can easily tune. Since we’ll later configure our victim machines to have no Internet access, we will need INetSim to simulate it.
There are several ways to install INetSim. The easiest is to run the following commands (in the analysis machine).
$ sudo su
$ echo "deb http://www.inetsim.org/debian/ binary/" > /etc/apt/sources.list.d/inetsim.list
$ wget -O - http://www.inetsim.org/inetsim-archive-signing-key.asc | apt-key add -
$ apt update
$ apt install inetsim
Note: in order to be able to copy-paste those commands in your analysis machine, select Devices > Shared Clipboard > Bidirectional.
We’ll come back later on how to use INetSim.
Burp
Unfortunately, it seems that INetSim’s SSL support is quite limited: it comes with a certificate for a single host (inetsim.org) and doesn’t support generating SSL certificates on the fly. This is a problem since most malwares nowadays encrypt their communications with SSL. We’ll use Burp as a transparent SSL proxy, which will stand in the middle of the victim machines and INetSim for SSL connections. If you don’t need to intercept SSL traffic for now, you won’t necessarily need Burp.
Burp supports generating on-the-fly SSL certificates for any our victim machines will connect to. It also creates a single root CA certificate, that we’ll later import in our victim machines. This way, we’ll be able to intercept the encrypted communications that our malware sends.
You can download Burp from the official website. The download is a bash installation script, run it to install Burp:
$ bash ~/Downloads/burpsuite_free_linux_v1_7_23.sh
By default, the Burp executable will be ~/BurpSuiteFree/BurpSuiteFree.
3. Setting up an isolated virtual network
As a reminder, we want to set up an isolated network containing our three VMs. This network will not be able to access the Internet. Also, we want the analysis machine to act as a network gateway to the victim machines in order to easily be able to intercept the network traffic and to simulate various services such as DNS or HTTP.
In order to achieve this, we will use a VirtualBox Internal Network. For those familiar with VirtualBox, an internal network differs from a host-only network in that an internal network cannot access the host machine at all.
For each of your three virtual machines, do the following:
- Open its settings
- Go to the Network section
- Change the Attached to field to Internal network
- Enter malware-analysis-network as the network name
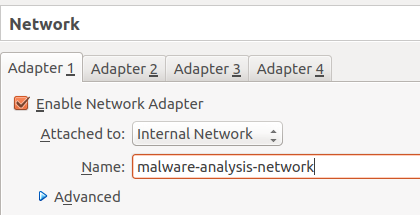
Analysis machine
Power on the analysis machine, open a terminal, and run the ifconfig command. You should have an interface named enp0s3. If the name differs, just adapt it in the instructions to follow.
Open the file /etc/network/interfaces as root, and add the following at the end:
auto enp0s3
iface enp0s3 inet static
 address 10.0.0.1
 netmask 255.255.255.0
This will assign the machine the static IP 10.0.0.1 on our virtual network. Now that we have configured the network interface, we need to start it up using:
$ sudo ifup enp0s3
Ubuntu victim machine
The process is very similar here, except that we’ll assign it the static IP 10.0.0.2, and instruct it to use 10.0.0.1 as a gateway and as a DNS server. Append the following at the end of the file /etc/network/interfaces :
auto enp0s3
iface enp0s3 inet static
 address 10.0.0.2
 gateway 10.0.0.1
 netmask 255.255.255.0
 dns-nameservers 10.0.0.1
And run:
$ sudo ifup enp0s3
$ sudo service networking restart
You should now be able to ping the analysis machine:
$ ping 10.0.0.1
PING 10.0.0.1 (10.0.0.1) 56(84) bytes of data.
64 bytes from 10.0.0.1: icmp_seq=1 ttl=64 time=0.480 ms
64 bytes from 10.0.0.1: icmp_seq=2 ttl=64 time=0.526 ms
Windows 7 victim machine
Right-click on the network icon in the taskbar (or go to Start Menu > Control Panel > Network and Internet > Network and Sharing center), click on Local Area Connection 2 > Properties, select on Internet Protocol Version 4, and click on the Properties button.
We’ll assign the static IP 10.0.0.3 to the machine, and configure the rest similarly to the Ubuntu victim machine.
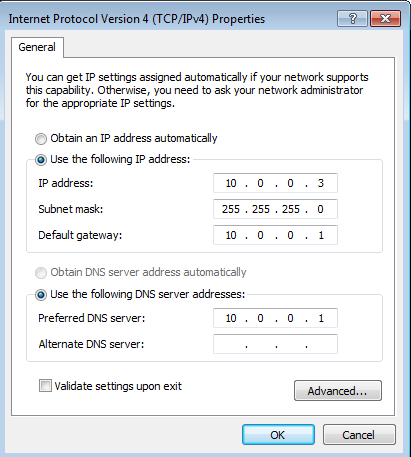
Make sure to validate the settings (click on OK, Apply, etc. until all the settings windows are gone). You should now be able to ping the analysis machine:
> ping 10.0.0.1

Pinging 10.0.0.1 with 32 bytes of data:
Reply from 10.0.0.1: bytes=32 time<1ms TTL=64
Reply from 10.0.0.1: bytes=32 time<1ms TTL=64
All set!
4. Creating and restoring snapshots
Now that our victim VMs are properly configured and are in a clean state (i.e. not infected by any kind of malware), we are going to make a snapshot of their current state. This way, we will be able to easily reset them to this clean state at any point time.
VirtualBox makes this very easy: in the window in which the VM is running, just select Machine > Take Snapshot. You can name the snapshot Clean state. Make sure to do this for both your Ubuntu and Windows 7 victim machines. It doesn’t hurt to do it for your analysis machine as well.
When you’ll want to reset a machine to its clean state, simply power it off and check the checkbox Restore current snapshot ‘Clean state’.
5. Using INetSim and Burp on the analysis machine to analyze the network traffic
INetSim
As previously mentioned, INetSim enables us to wide range of standard Internet services including DNS, HTTP(S), SMTP, etc. It has a default configuration file /etc/inetsim/inetsim.conf which is very well documented. It also ships with a data directory (/var/lib/inetsim) containing various default files.
Since you’ll probably want a different INetSim configuration each time you make a new analysis, I suggest you create a directory analysis which will contain a sub directory for each analysis.
$ mkdir analysis
We’ll already create a sub directory for the sake of example, and copy the default INetSim configuration file and data folder in it.
$ mkdir analysis/test-analysis
$ cp /etc/inetsim/inetsim.conf analysis/test-analysis
$ sudo cp -r /var/lib/inetsim analysis/test-analysis/data
$ sudo chmod -R 777 data
$ cd analysis/test-analysis
By default, INetSim listens on the local interface only. To make it available to all the machines of our virtual network, replace the following line in the configuration file we just copied:
#service_bind_address 10.0.0.1
By:
service_bind_address 0.0.0.0
Now, we need to disable systemd-resolved, which is a local DNS server shipped by default with Ubuntu and will conflict with INetSim’s DNS server.
$ sudo systemctl disable systemd-resolved.service
$ sudo service systemd-resolved stop
By default, INetSim’s DNS server will resolve all the domain names to 127.0.0.1. We want any domain name to resolve to 10.0.0.1 (the analysis machine IP) instead; uncomment the following line:
#dns_default_ip 10.0.0.1
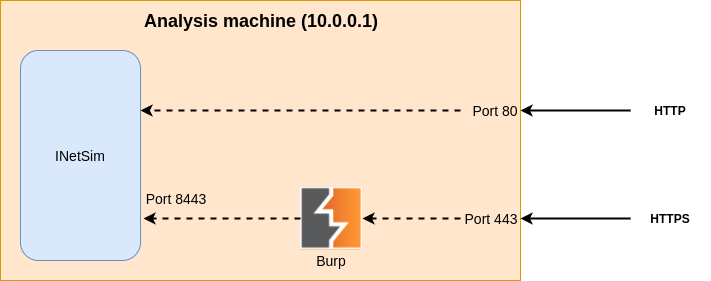
I mentioned earlier that INetSim’s SSL support is not optimal since it only has a single certificate for a single hostname (inetsim.org) and doesn’t allow to generate per-host certificates on the fly. To overcome that, we’ll run Burp on port 443 as a transparent proxy in front of INetSim. Therefore, we need to bind INetSim’s HTTPS server to a different port, say port 8443. Replace the following line:
#https_bind_port 443
By:
https_bind_port 8443
Now, let’s run INetSim!
$ sudo inetsim --data data --conf inetsim.conf
INetSim 1.2.6 (2016-08-29) by Matthias Eckert & Thomas Hungenberg
[...]
=== INetSim main process started (PID 3605) ===
Session ID: 3605
Listening on: 0.0.0.0
Real Date/Time: 2017-06-04 12:58:07
Fake Date/Time: 2017-06-04 12:58:07 (Delta: 0 seconds)
 Forking services...
 * dns_53_tcp_udp - started (PID 3621)
 * irc_6667_tcp - started (PID 3631)
 * daytime_13_tcp - started (PID 3638)
 * discard_9_tcp - started (PID 3642)
 * discard_9_udp - started (PID 3643)
 * ident_113_tcp - started (PID 3634)
 * syslog_514_udp - started (PID 3635)
[...]
As you can see, INetSim has launched a bunch of network services. Those are all configurable and can be disabled in the configuration file. This configuration file is very well documented and explains all the options of INetSim; I recommend you take a few minutes to read it.
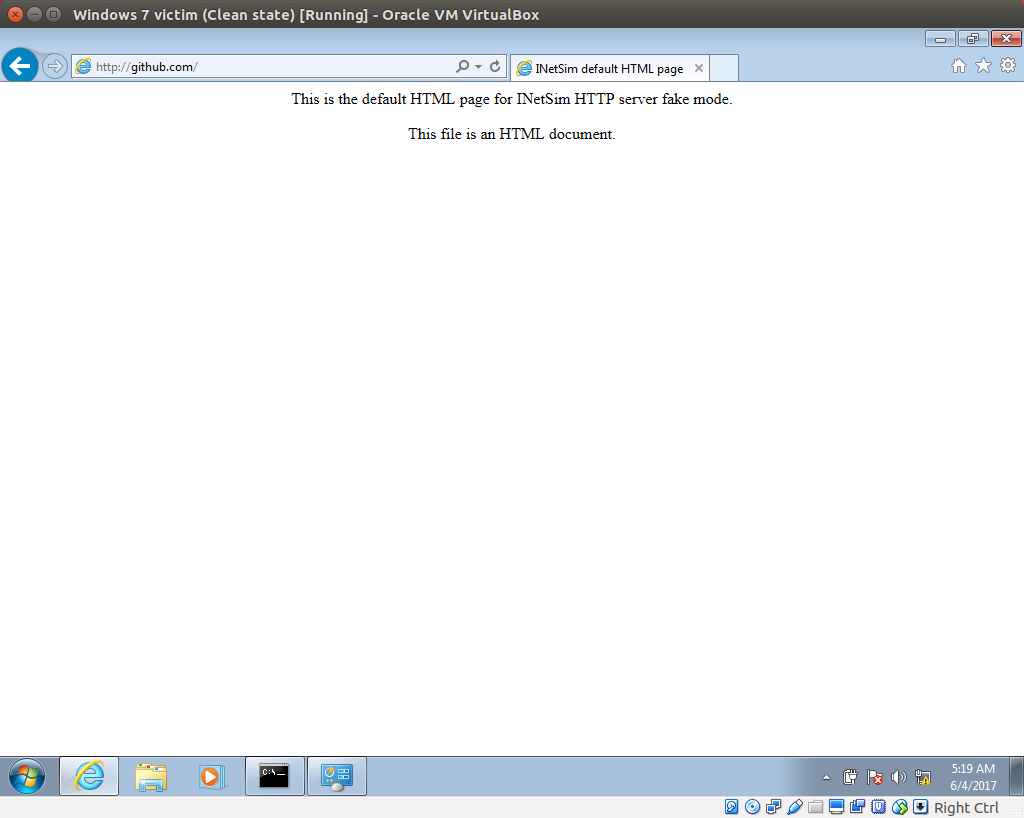
Now, power on of your victim VM, open a web browser, and browse to any address (e.g. github.com). You should see the following:
(Note that this default file corresponds to the HTML file data/http/fakefiles/sample.html.)
Back on the analysis machine, shut down INetSim (CTRL + C).
* dns_53_tcp_udp - stopped (PID 3621)
* irc_6667_tcp - stopped (PID 3631)
* daytime_13_tcp - stopped (PID 3638)
[...]
Simulation stopped.
 Report written to '/var/log/inetsim/report/report.3877.txt' (24 lines)
As you can see, INetSim has created a summary report for us. It contains all the interactions our victim machine had with INetSim services.
=== Report for session '3877' ===

Real start date : 2017-06-04 13:18:27
Simulated start date : 2017-06-04 13:18:27
Time difference on startup : none

2017-06-04 13:18:38 First simulated date in log file
2017-06-04 13:18:40 DNS connection, type: A, class: IN, requested name: github.com
2017-06-04 13:18:40 HTTP connection, method: GET, URL: http://github.com/, file name: data/http/fakefiles/sample.html
2017-06-04 13:18:40 HTTP connection, method: GET, URL: http://github.com/favicon.ico, file name: data/http/fakefiles/sample.html
2017-06-04 13:18:40 Last simulated date in log file
Burp for SSL interception
To be able to analyze the SSL traffic, we also need to run Burp. We’ll run it as a transparent proxy in front of INetSim. When a victim machine will initiate a SSL connection, it will first go to Burp, which will then proxy it to INetSim. This section is not mandatory: if you don’t need to intercept SSL traffic right now, just jump to the next section.
Here’s how it will look like with Burp in the middle:
Start Burp as root:
$ sudo /home/osboxes/BurpSuiteFree/BurpSuiteFree
(We need to run it as root otherwise it won’t be able to bind port 443, which is a privileged port. There are other ways to do this, but let’s not bother here)
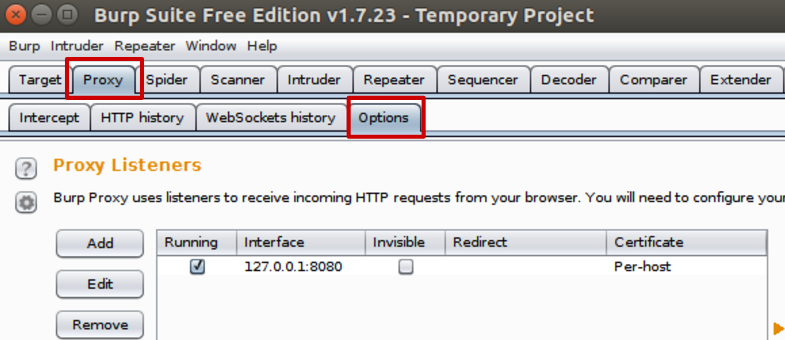
Create a temporary project (you don’t have any other options with the free version anyway), and go to the Proxy tab, then to the Options sub-tab. You’ll see Burp’s default listener listening on port 8080.
Click on the row corresponding to the default listener, and edit it (Edit) button. Configure it as follows:
- Binding tab
- Bind to port: 443
- Bind to address: all interfaces
- Request handling tab:
- Redirect to host: localhost
- Redirect to port: 8443
- Check Support invisible proxying
Validate the settings, and you should get a listener similar to:
By default, Burp intercepts the incoming requests and waits for you to explicitly let them pass through. To avoid this, go to the Intercept tab and click the button Intercept is on to disable it.
Since Burp Free doesn’t allow you to save a project, you can export the settings we just made in order to import them next time you start Burp. To do this, use Burp > Project options > Save project options.
Let’s make sure our setup if correctly working. Start INetSim, and run:
$ curl --insecure https://localhost
You should get:
<html>
 <head>
 <title>INetSim default HTML page</title>
 </head>
 <body>
 <p></p>
 <p align="center">This is the default HTML page for INetSim HTTP server fake mode.</p>
 <p align="center">This file is an HTML document.</p>
 </body>
</html>
Importing Burp’s CA certificate on our victim machines
Power on your Windows 7 victim machine, and try to browse to a HTTPS URL (e.g. https://github.com), you’ll see a warning similar to:
This is because Burp generates a SSL certificate signed by its own CA certificate, which our victim machine doesn’t trust for now.
In Burp, add a new proxy listener on port 8080, listening on all interfaces (tab Proxy > Options > button Add):
Then, from the victim machine, browse to http://10.0.0.1:8080.
Click on CA Certificate in the top-right corner to download Burp’s CA certificate.
On the Windows 7 victim machine: open the file, click Install certificate >Next > Place all certificates in the following store: Trusted Root Certification Authorities > Next
On the Ubuntu victim machine:
- Convert the certificate to the appropriate format (.crt) using
-
$ openssl x509 -in ~/Downloads/cacert.der -inform DER -out burp.crt
- Copy it to /usr/local/share/ca-certificates
-
$ sudo cp burp.crt /usr/local/share/ca-certificates/
- Run
-
$ sudo update-ca-certificates
- Firefox by default doesn’t use the system’s certificate store. If you want the SSL connection to work properly in Firefox as well, go to the Firefox settings into Advanced > Certificates > Import. Choose burp.crt, check Trust this CA to identify websites
All set!
Once you imported Burp’s CA certificate in the victim machines, make sure to create a new snapshot (e.g. Clean state with Burp’s CA certificate installed).
6. Setting up a shared folder between the analysis machine and the host OS
At some point, you’ll obviously want to transfer some files to the analysis machine or to one of the victim machine; we’ll set up a file share to achieve it.
In the VirtualBox running the analysis machine, go to Devices > Shared Folders > Shared folders settings. Create a new shared folder, choose the local folder of your host OS it should be mapped to, and choose a name. Check the checkbox to make it permanent.
Now on the analysis machine, mount the shared folder:
$ mkdir ~/malware-analysis-share
$ sudo mount -t vboxsf -o uid=$UID,gid=$(id -g) malware-analysis-share ~/malware-analysis-share
And you’re good to go. In my case, all the files of my host machine located in /home/christophetd/malware-analysis-share will also end up in ~/malware-analysis-share in the analysis machine.
Transferring files to a victim machine
At some point, you’ll most probably need to transfer some files (e.g. malware samples) to one of the victim machines. Setting up a file share for them is a bad idea, because it means the victim machine (and by extent, the malware sample you’re running on it) have access to it.
The simplest way to achieve a file transfer to the Ubuntu victim machine is to use netcat. Here’s a quick example.
# Receiving machine having IP 10.0.0.2
$ nc -lvp 4444 > file.exe

# Analysis machine (sender)
$ cat file_to_transfer.exe | nc 10.0.0.2 4444
For a Window victim, we unfortunately don’t have netcat available. Alternatives might exist, but they probably don’t ship by default. One option is to use INetSim to serve your file to the victim machine.
# inetsim.conf

# Remove the default line: http_fakefile           exe     sample_gui.exe  x-msdos-program
# Replace it by
http_fakefile           exe     file_to_transfer.exe  x-msdos-program

# And put file_to_transfer.exe in ./data/http/fakefiles
With this of configuration, just browse any URL ending with a ‘.exe’ (e.g. http://github.com/file.exe).
7. Demo time: the TeslaCrypt ransomware
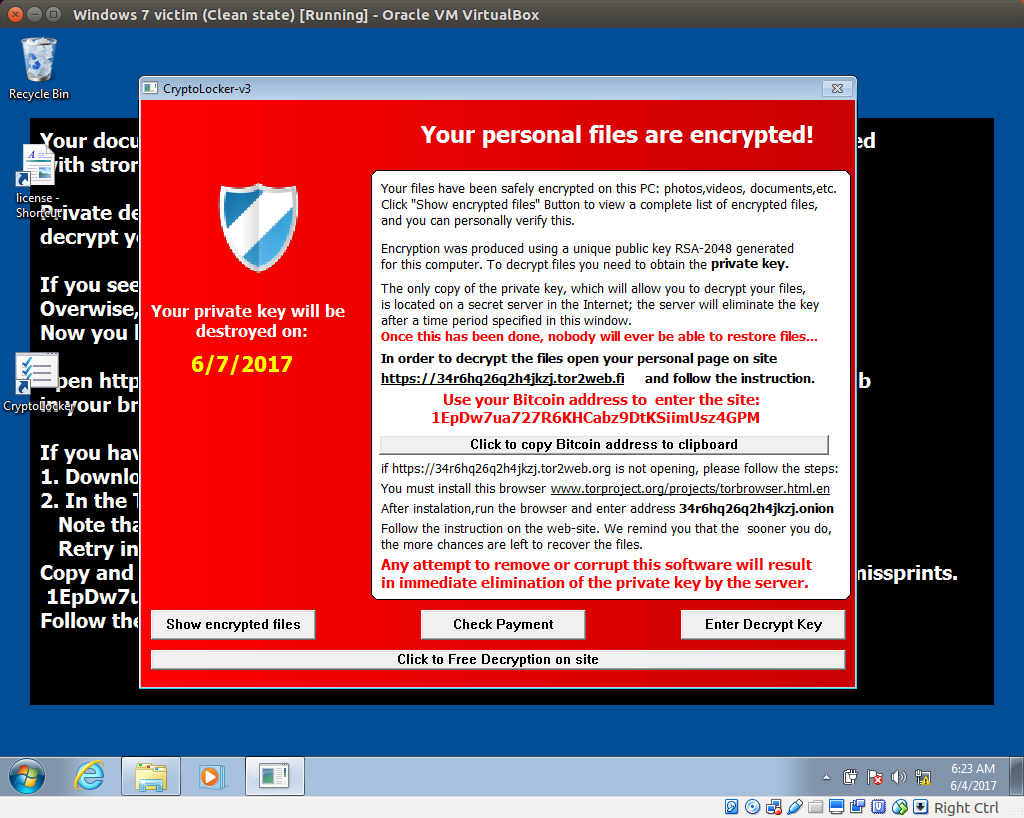
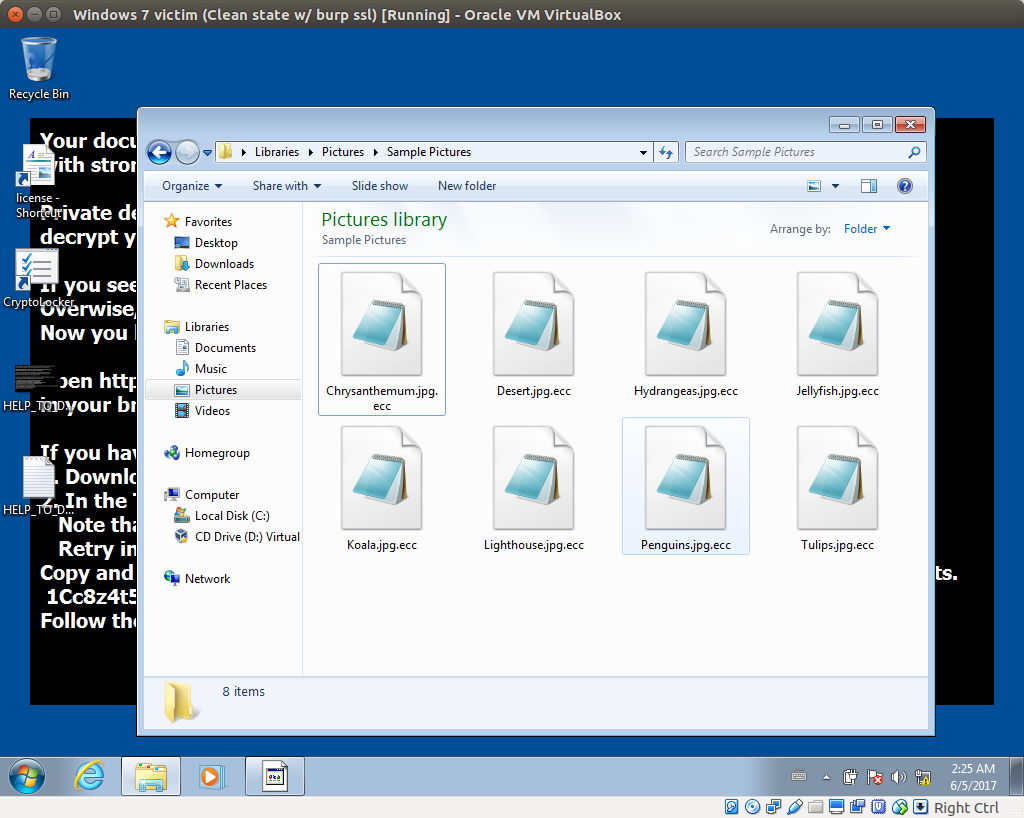
Time for a quick demo! I downloaded a sample of the ransomware TeslaCrypt, transferred it to our Windows 7 victim machine, and executed it. After a few seconds, all the files of the VM have been encrypted and the following window pops-up.
After checking the logs of INetSim, we can see that the ransomware did the following DNS lookups:
- 7tno4hib47vlep5o.tor2web.org
- 7tno4hib47vlep5o.tor2web.blutmagie.de
- 7tno4hib47vlep5o.tor2web.fi
- bitcoin.toshi.io
And sent several HTTP requests to those domains.
HTTPS connection, method: GET, URL: https://7tno4hib47vlep5o.tor2web.org/state.php?U3ViamVjdD1QaW5nJmtleT0xNUIzOEIxOEFGMjBDMERCMkE3Qzc3MUUwMTQzNjNGMkNCODc4MUIxNTZENTE5Q0M1RjIyMDMzNUQ0NzE0QUEzJmFkZHI9MUxOVUYzQnFMM29iMUNUMmFWcDNjVzROYjh6a2tWaVZ3VCZmaWxlcz0wJnNpemU9MCZ2ZXJzaW9uPTAuMi42YSZkYXRlPTE0OTY2NDg2NzUmT1M9NzYwMSZJRD0xNiZzdWJpZD0wJmdhdGU9RzA=
HTTPS connection, method: GET, URL: https://7tno4hib47vlep5o.tor2web.blutmagie.de/state.php?U3ViamVjdD1QaW5nJmtleT0xNUIzOEIxOEFGMjBDMERCMkE3Qzc3MUUwMTQzNjNGMkNCODc4MUIxNTZENTE5Q0M1RjIyMDMzNUQ0NzE0QUEzJmFkZHI9MUxOVUYzQnFMM29iMUNUMmFWcDNjVzROYjh6a2tWaVZ3VCZmaWxlcz0wJnNpemU9MCZ2ZXJzaW9uPTAuMi42YSZkYXRlPTE0OTY2NDg2NzUmT1M9NzYwMSZJRD0xNiZzdWJpZD0wJmdhdGU9RzE=
HTTPS connection, method: GET, URL: https://7tno4hib47vlep5o.tor2web.fi/state.php?U3ViamVjdD1QaW5nJmtleT0xNUIzOEIxOEFGMjBDMERCMkE3Qzc3MUUwMTQzNjNGMkNCODc4MUIxNTZENTE5Q0M1RjIyMDMzNUQ0NzE0QUEzJmFkZHI9MUxOVUYzQnFMM29iMUNUMmFWcDNjVzROYjh6a2tWaVZ3VCZmaWxlcz0wJnNpemU9MCZ2ZXJzaW9uPTAuMi42YSZkYXRlPTE0OTY2NDg2NzUmT1M9NzYwMSZJRD0xNiZzdWJpZD0wJmdhdGU9RzI=
HTTPS connection, method: GET, URL: https://bitcoin.toshi.io/api/v0/addresses/1LNUF3BqL3ob1CT2aVp3cW4Nb8zkkViVwT
We see similar requests are made to tor2web.org, tor2web.blutmagie.de and tor2web.fi. Those services allow to access the Tor network without having to install Tor Browser or a similar tool.
The malware contacts the Tor hidden service 7tno4hib47vlep5o.onion, which is probably some kind of C&C server. The payload of the request is a base64 encoded string, which decodes to:
Subject=Ping
&key=15B38B18AF20C0DB2A7C771E014363F2CB8781B156D519CC5F220335D4714AA3
&addr=1LNUF3BqL3ob1CT2aVp3cW4Nb8zkkViVwT
&files=0
&size=0
&version=0.2.6a
&date=1496648675
&OS=7601
&ID=16
&subid=0
&gate=G1
It also makes an API call to bitcoin.toshio.io (which doesn’t exist anymore), most probably to check if the ransom has been paid to the bitcoin address 1LNUF3BqL3ob1CT2aVp3cW4Nb8zkkViVwT. It seems like the malware generates an unique bitcoin address for each infected computer, since the address didn’t receive or send out any money.
Conclusion
Hopefully this guide will be helpful and allow you to safely analyze the network interactions of a malware. Keep in mind that some malwares detect when they are being run in a virtual machine and might adapt their behavior (e.g. do nothing). Here’s an article from MalwareBytes on the subject.
Also, remember that while analyzing a malware’s network traffic can be very useful, it’s only one kind of dynamic analysis. Others include monitoring the register, the system calls, the files opened / created, etc. Open Security Training offers a full hands-on course on the topic, for free.
Don’t hesitate to leave a comment if you found this guide useful / awesome / too long / too detailed. A big thank you to lbarman for the proofreading and numerous suggestions.
Stay safe!
Liked this post? Show it by pushing the heart button below! You can also follow me on Twitter.



Awesome! You prefer to use Burp instead of Fiddler?
Thanks! Just more familiar with Burp, but I guess Fiddler could do the trick as well.
Pingback: Linux, Python and other useful resource links – Veerendra's Blog
This lab would detected wanna cry killswitch domain name
I’m not familiar with how WannaCry communicated with the kill-switch, but I’d say that yes, it would have detected that the malware was trying to access it.
Excellent lab tutorial.
Pingback: Set up a malware analysis lab with VirtualBox, INetSim and Burp | ExtendTree
Great tutorial, thank you! Where did you get your teslacrypt sample from?
Thanks! I got it from The Zoo
Cannot download TeslaCrypt from The Zoo.
I downloaded it from: https://github.com/ytisf/theZoo/tree/master/malwares/Binaries/Ransomware.TeslaCrypt
I loved your post. somehow I cannot not infect my windows. I downloaded teslacrypt binary and copied the zip to the win7-victim. but I cannot infect the system, do I need to extract the zip (then there are 3 files with hex names) or should I just run it as exe? am I missing something?
As far as I remember I just had to rename the file with a .exe extension, run it, and wait a few minutes.
I think “sudo service systemd-resolved.service stop” should be “sudo service systemd-resolved stop” (at least that is what worked for me).
Great write up btw, really enjoyed it.
Thank you for noticing, I fixed it! Cheers
Hi Chris,
Thanks for the write up, very well done.
A quick question out of curiosity since I’ve only been exposed to a QWERTY set up are you unfamiliar with this because your keyboard is in another language or do you have a preference for a different keyboard layout?
Regards,
Luke
Hi,
Glad you liked the write up! I’m not familiar with QWERTY simply because I’m used to other layouts (AZERTY, QWERTZ).
Cheers.
Pingback: Crea tu propio laboratorio de análisis de malware con VirtualBox, INetSim and Burp
Pingback: My Reading List Q2 2017 | Bigta
Great article! How would you deal with URLs which download files however? For example, let’s say I want to analyze a phishing email which has a URL which redirects multiple times until it downloads a malicious file. Using Inetsim, I’ll only see the original URL being requested by the Victim VM, but I’ll never see the subsequent URLs or the file being downloaded. What would you recommend to truly simulate internet access to see where these kind URLs actually lead to? (aside from actually giving the Victim VM full internet access, which would defeat the whole purpose. Or running the lab in AWS, which would be costly)
It’d be great to hear your thoughts on this.
Hi Rick,
If I understood correctly, you’re talking about malicious URLs with multiple redirections, e.g. malicious1.com -> malicious2.com -> malicious3.com/file.exe ? I don’t think this can easily be analyzed with INetSim. I’d recommend manually following the redirections (e.g. using curl) to get to the final file and, once you have it, use INetSim to return the file to the malware.
Hope that helps!
Christophe
Where can I download a sample for TeslaCrypt version 2?
I downloaded the sample from https://github.com/ytisf/theZoo/tree/master/malwares/Binaries/Ransomware.TeslaCrypt
Hi
For example i install vmware workstation on my pc ( for example on Windows 7 ) , and make a Windows XP vm in that , and use that Windows XP vm for analysing malwares , and one day i analyse a very dangerous , zero day malware in that Windows XP vm … In this situation the worst thing that could happen is that my Windows XP vm is corrupted and destroyed … This is not too bad because i can make another Windows XP vm in 5 minutes ….Now this is my question … In such situation , could that very dangerous and zero day malware corrupt vmware workstation itself ? and then corrupt the Windows 7 host system ? If these things happen , it would be very bed for me and i want to know about that and the possibility of happening that . Thanks
Hi,
Indeed, it doesn’t really matter if a malware tampers with your virtual machine, as you can restore it to a previous state (without even needing to recreate it) within a matter of minutes.
You’re also right regarding the other point: if a malware was to exploit a VMWare / VirtualBox vulnerability enabling him to escape the virtual machine, it could theoretically access your host computer. However, I’d say those vulnerabilities are very rare. If your threat model includes protecting against those vulnerabilities, the best would be to use a dedicated machine (e.g. separate laptop), not connected to the Internet or your local network, to do malware analysis on.
Cheers!
Christophe
I just recommend choosing a recent Ubuntu distribution, as 16.10 is not available.
Hi Christophe,
Very nice article and thank you very much for sharing.
Is the Ubuntu 16.10 a must or I could choose another since it’s not available anymore on the link you provided. 17.10 is available but I’m leaning on using 16.04.
Will there be a difference?
Thanks for your comment! Indeed, I included a link to 16.10, but 16.04 will be fine as well (even better actually). Regarding 17.10+, this could be an issue with regards to network configuration, as newer versions switched to using netplan instead of /etc/network/interfaces for the network configuration. As such, I’d recommend you stick to 16.04, which is a LTS supported until 2021 anyway. 🙂
Hey @christophertd, I really enjoyed your article. I’ve used it as a main jumping point from an enterprise course I did regarding reversing malware that used VMWare Workstation. I used `ovftool` to seamlessly convert the images to .ovf format for VirtualBox and it worked just fine (there were some quirks here and there but nothing Uncle Google couldn’t handle!).
A couple of quick startup tips: I use REMnux from SANS’s Lenny Zeltser as the Linux analysis machine. It is fantastic and comes packed with a lot of cool toys and scripts. Also, I use FakeDNS.py to simulate a fake DNS server instead of doing the manual work as you mentioned. As for the Windows Victim machine, I’m using my own but I heard great things about FlareVM from FireEye. I’m including links to all the above below.
Thanks again and I hope you keep this post alive!!
– https://remnux.org/
– http://code.activestate.com/recipes/491264-mini-fake-dns-server/
– https://github.com/fireeye/flare-vm
Thanks a lot for the feedback!
It is very good content. Thank you!!
Great article. Thank you for sharing.
However I cannot install Inetsim on my Analysis machine.
it says “no valid OpenPGP data found” on the second step of the installatio and “E: Enable to locate package inetsim” on the last step.
I tried the installation again on an Ubuntu 17.10 machine, and it is working fine for me. Can you double check you ran the right commands, and if that’s the case provide more details (such as your Ubuntu version)? Thank you!
Thank you for the prompt response.
I copied out the commands from the article and it did not work.
I used Ubuntu version 16.4.05 (64bits).
I’ll give it a go with 17.10 now as you suggested.
I think I got it.
I was behind corporate proxy using our company certificate.
Workaround would be to use the no-check-certificate key or do it at home 🙂
I’ll give it a go at home and put another commentary here.
Yes it’s been the proxy.
No problems at home.
Pingback: Malware Analysis Toolkit – Infosec Squirrel
Hey – awesome tutorial!
A quick question – how do you handle other file extensions when transferring onto the Win victim machine? E.g. zip files?
i am not able to copy/paste the burp suite to ubuntu analysis machine, can you please help. I can copy/paste text but cannot transfer files.
I checked the bidirectional option for shared clipboard and Drag&Drop.
Open your network to public(NAT), access this tutorial and download the burp suite. Once done change network to private.
Pingback: Tips & tricks #1: MITM proxy with fakenet and realnet mode – MalFind
Thank you, christophetd!
I enjoyed this and it was easy to follow.
Cheers
Hi
thank you so much for this awesome tutorial, I haven’t found any other tutorial like this.
but when I put the analysis machine into internal network and then assign the static ip to the machine and ifconfig up the network. it won’t show the the static ip when I enter ifconfig, it only shows the ipv6 for enp0s3 and the gui shows that I’m now offline. I thought maybe this is part of the tutorial ( being offline from the network ) but when I assigned the static ip to the windows victim machine and pinged the 10.0.0.1 to reach the linux machine it shows that:
ping 10.0.0.1
Reply from 10.0.0.3: Destination host unreachable. ( 4 times)
which means that even thought the vicim machine ( win 7 ) and analysis machine (Xubuntu) are in a same internal network ( I made sure that they both using the same internal network from virtualbox). victim machine can’t reach the analysis machine at all.
I have another question regarding the static ip of analysis machine, did you use tab or space indention and how many tab or space did you use for /etc/network/interfaces file after this line:
“iface enp0s3 inet static”
because I know that linux is picky when it comes to this matter
I think your way of isolation the malware lab is the best of seen from other people who use other network option and I really want to make this work.
with great regards and thank you for this awesome tutorial
phoenix
Thank you for your great blog post! The only thing I’m missing in this setup is to be able to analyze the the SSL traffic from burp with Wireshark. I have managed to replace Burp with PolarProxy in order to intercept the TLS traffic and save it to disk, as described here:
https://netresec.com/?b=19Ce12f
Pingback: Understanding VirtualBox networking schemes to set up a good and safe lab – Blog
Hi,
When i try to curl after configuring Burp I get the error message: Failed to connect to localhost.
Any idea what might cause this?
Pingback: Virtual Malware Analysis Lab w/ INetSim & Burp – Games and Theory
Pingback: C2 Traffic Patterns: Personal Notes – Marco Ramilli Web Corner
For some reason these instructions must be outdated because netsim will not install. Any thoughts?
Pingback: Build A Professional Practice Lab - 101
Pingback: Set up your own malware analysis lab with VirtualBox, INetSim and Burp - Christophe Tafani-Dereeper -
If you get the issue “apt-key is deprecated” while installing inetsim, this worked for me: (type in terminal)
KEYRING=/usr/share/keyrings/inetsim.gpg
curl -fsSL http://www.inetsim.org/inetsim-archive-signing-key.asc | gpg –dearmor | sudo tee “$KEYRING” >/dev/null
(if you don’t have curl, you can install it with :
snap install curl
apt install curl)
Then run:
apt install inetsim
Pingback: Malware Analysis & SSL/TLS - Byte Breach