I’ll explain in this article how to properly setup a SFTP server with chrooted users being only able to access their own directory, and authenticated by public keys or a password. This is a very useful setup, which can get a bit tricky especially with the permissions.
Unlike FTPS which is FTP over TLS, SFTP is a totally different protocol built on top of SSH. This especially means you don’t need any third-party software, since OpenSSH is installed by default on most linux distributions.
Directory organization
Each user will have his own personal directory which he’ll be able to access. But he will not be able to escape that directory and to modify anything else on the server. The root SFTP directory will be /var/sftp.

Run the following commands to create the /var/sftp directory and make sure it is owned by an administrator user (e.g. root)
sudo mkdir -p /var/sftp
sudo chown root:root /var/sftp
sudo chmod 751 /var/sftp
Creating our users
Let’s start by creating a group in which we’ll put our SFTP users.
groupadd sftp
We can then create our users, assigning them to the newly created group.
useradd --system --shell /usr/sbin/nologin --groups sftp --home /var/sftp/bob bob
useradd --system --shell /usr/sbin/nologin --groups sftp --home /var/sftp/alice alice
And create their respective home directory.
mkdir /var/sftp/bob /var/sftp/alice
/var/sftp/bob has to be owned by the root user and the sftp group. Bob can’t have write permissions on this folder, otherwise he won’t be locked in it. But a problem arises from this: if Bob can’t have write permissions on this folder, how will he be able to create and edit his files? The answer to this is that we need to a create a directory a level below on which Bob has ownership and read / write permissions.
chown root:sftp /var/sftp/bob
chmod 751 /var/sftp/bob
mkdir /var/sftp/bob/files
chown bob:sftp /var/sftp/bob/files
chmod 751 /var/sftp/bob/files
And the same for Alice.
chown root:sftp /var/sftp/alice
chmod 751 /var/sftp/alice
mkdir /var/sftp/alice/files
chown alice:sftp /var/sftp/alice/files
chmod 751 /var/sftp/alice/files
Setting up OpenSSH
Let’s continue by setting up OpenSSH. Our goals are:
- to enable Bob and Alice to connect on the server only to use SFTP commands
- to enable Bob and Alice to authenticate using standard public keys
- to lock Bob and Alice in their home directory so they are not able to see / read / delete anything else
Start by opening the SSH configuration file, /etc/ssh/sshd_config. At the end of this file, add the following section.
Match group sftp
     ChrootDirectory /var/sftp/%u
     AllowTCPForwarding no
     X11Forwarding no
     ForceCommand internal-sftp
In plain english, this would read:
Users in the
sftpgroup should be locked in the/var/sftp/[username]directory and only be allowed to run SFTP command. Also, don’t allow them to create SSH tunnels (AllowTCPForwardingandX11Forwardingdirectives).
Save this file and reload OpenSSH using service sshd reload.
Authenticating
The next step is to allow Bob and Alice to authenticate on the server. I strongly suggest to use the public key authentication method, but for convenience I’ll provide the method to allow a standard password based authentication.
Public key authentication
Generating the keys
We’ll use the ssh-keygen command to create a key pair composed of a public key, that can be shared with anyone, and a private key that must be kept secret. The standard way to proceed is (taking Bob as an example):
- Bob generates a key pair on his computer
- Bob sends you (the server administrator) his public key, over an insecure channel such as email
- You add Bob’s public key to the list of Bob’s public keys on the server to allow him to connect
Another way would be to generate the keys yourself, and to transmit them to Bob via a secure channel (e.g. physically or via encrypted email). When you generate the keys, you also have an option to encrypt the private key with a passphrase. If you do so, the private key will be unusable without this passphrase. This makes it easier to share the key with Bob since you can then share the private key via an insecure channel and only the passphrase via a secure one.
Let’s now see how to generate a key pair. Note that this should preferably not be done on the server himself, since the private key has nothing to do there and should stay private (ideally, on Bob’s laptop).
ssh-keygen -t rsa -b 4096
The command will ask you where to store the keys (e.g., on Bob’s laptop, /home/bob/.ssh/sftp_key) and if you want to encrypt the private key with a passphrase. If you don’t, just hit enter. After that, two files will be created.
- sftp_key.pub : the public key that can be shared with anyone
- sftp_key : the private key that should remain secret
Allowing the key pairs on the server
To allow Bob’s public key to connect to Bob’s account on the server, simply create the file /var/sftp/bob/.ssh/authorized_keys and add his public key to it.
mkdir /var/sftp/bob/.ssh
echo "ssh-rsa AAAAB3NzaC1yc2EAAAADAQABAAACAQDEVK...." >> /var/sftp/bob/.ssh/authorized_keys
Also make sure the .ssh directory belongs to Bob (which won’t be the case if you ran the previous command as root).
chown -R bob:bob /var/sftp/bob/.ssh
Disabling password based authentication
If you want to disable password base authentication for your SFTP users (which you should if you plan to only use public keys), add the following line to our SSH configuration in /etc/ssh/sshd_config.
# just below ForceCommand internal-sftp
PasswordAuthentication no
And reload OpenSSH configuration using service sshd reload.
Password based authentication
If you wish to use a password based authentication, you simply need to set a password for Bob and Alice:
passwd bob
passwd alice
In case you change your mind and want to switch to public key authentication later, you can:
- (preferred method) either disable password based authentication for the SFTP users (previous section)
- either lock Bob’s password:
passwd --lock bob(which can be unlocked usingpasswd --unlock bob - either remove Bob’s password completely:
passwd --delete bob
Connecting to the server
With a graphical client
Using public key authentication
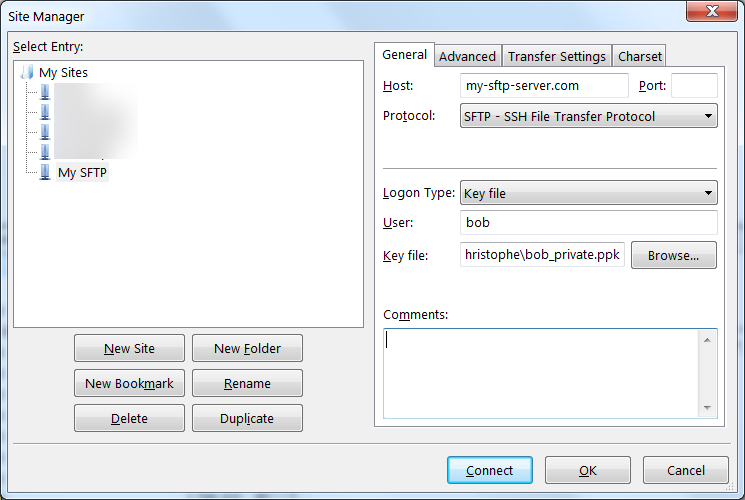
If you wish to connect using a standard SFTP client such as FileZilla or WinSCP, you first have to convert your private key in a different format called PPK. The process is very simple so I won’t bother explaining it, see this article instead. Once you have the PPK file in your possession, you can use it in your SFTP client to connect to the server. Here’s what it looks like in FileZilla.
Using password based authentication
The configuration is quite straightforward.

If you’re using FileZilla, I strongly recommend you don’t store the password in it, because FileZilla has the major drawback of storing your passwords unencrypted on your hard drive. If you need to save the password, use WinSCP and make sure to define a master password so that nothing gets stored in plain text.
From the command line
If you wish to connect via the command line (which can be very handy for automated processes, if you have no graphical interface at your disposal, or simply if you’re a nerd), you can use the following.
Using public key authentication
sftp -i sftp_key bob@your-server
Note that sftp_key here is the private key, not the public key. After that, you can start listing / creating / uploading file.
Using password based authentication
 sftp -o PubkeyAuthentication=no bob@your-server
 (enter your password and hit Enter)
Playing around with SFTP in the command line
sftp> ls
files

sftp> cd files

sftp> mkdir music

sftp> mkdir documents

sftp> ls
documents music

sftp> !ls /home/christophe  # list local files (not the ones on the sftp server)
Rick_Astley.mp3 Doc.pdf

sftp> put /home/christophe/Rick_Astley.mp3 music/ # upload Rick_Astley.mp3 to the remote music folder
Want more? You can take a look at this tutorial from DigitalOcean.
Making sure everything is as expected
Let’s make sure everything works as intended.
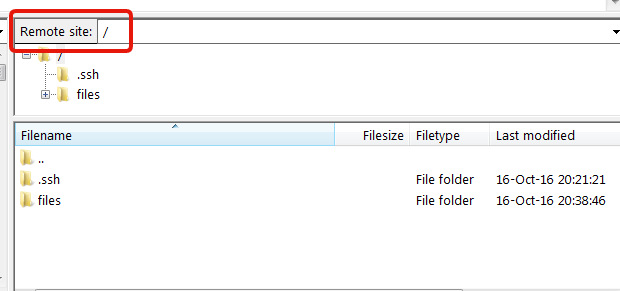
As you can see, even if we’re actually in /var/sftp/bob on the server, the SFTP client shows that we’re in the / directory, and we have no way to go up in the arborescence.
We can also try to SSH on the server:
> ssh -i sftp_key bob@your-server   # replace '-i sftp_key' with '-o PublickeyAuthentication=no' if using a password
This service allows sftp connections only.
Connection to 146.185.144.137 closed.
Any questions, remark, suggestions? Feel free to leave a comment or to ping me on twitter.
Thank you for the nice article.
I believe if you do an
sftp> ls -al
you will see the .ssh directory. This is something I would prefer the sftp user not to see at all or at least not to have access to. If the user deletes the contents of the .ssh directory he can log himself out of the account.
Not sure if this is possible though.
It is possible, actually we run it like that, for exactly the same reason.
You only need to separate user’s home folder from chrooted folders (in this example they are the same). That way .ssh can reside in user’s home folder (say `/home/bob/.ssh`) and actual chrooted files will be on `/var/sftp/bob/files` so not mixed with .ssh folder.
If you already created everything like in this (excellent) example, then simply editing /etc/passwd file and changing home folder for bob to /home/bob, then creating /home/bob (owned by bob:bob) and moving .ssh folder there would get you to desired result.
This is a really impressive post. Very thorough and it solves what I believe to be a common, but not well documented problem of using sftp with chroot and ssh authentication. Thank you.
Thank you! I’m glad you found it useful!
Very well explained, thanks for the post! I also had to add the following line to the sshd_config (at least on Debian 11 / bullseye):
Subsystem sftp internal-sftp
To directly switch to the files directory, I used:
ForceCommand internal-sftp -d files